


elcome back to another post. I'm Tario Sultan. A couple days ago, I have finally received my Bobcat Miner 300. This is my helium miner I ordered back in April.
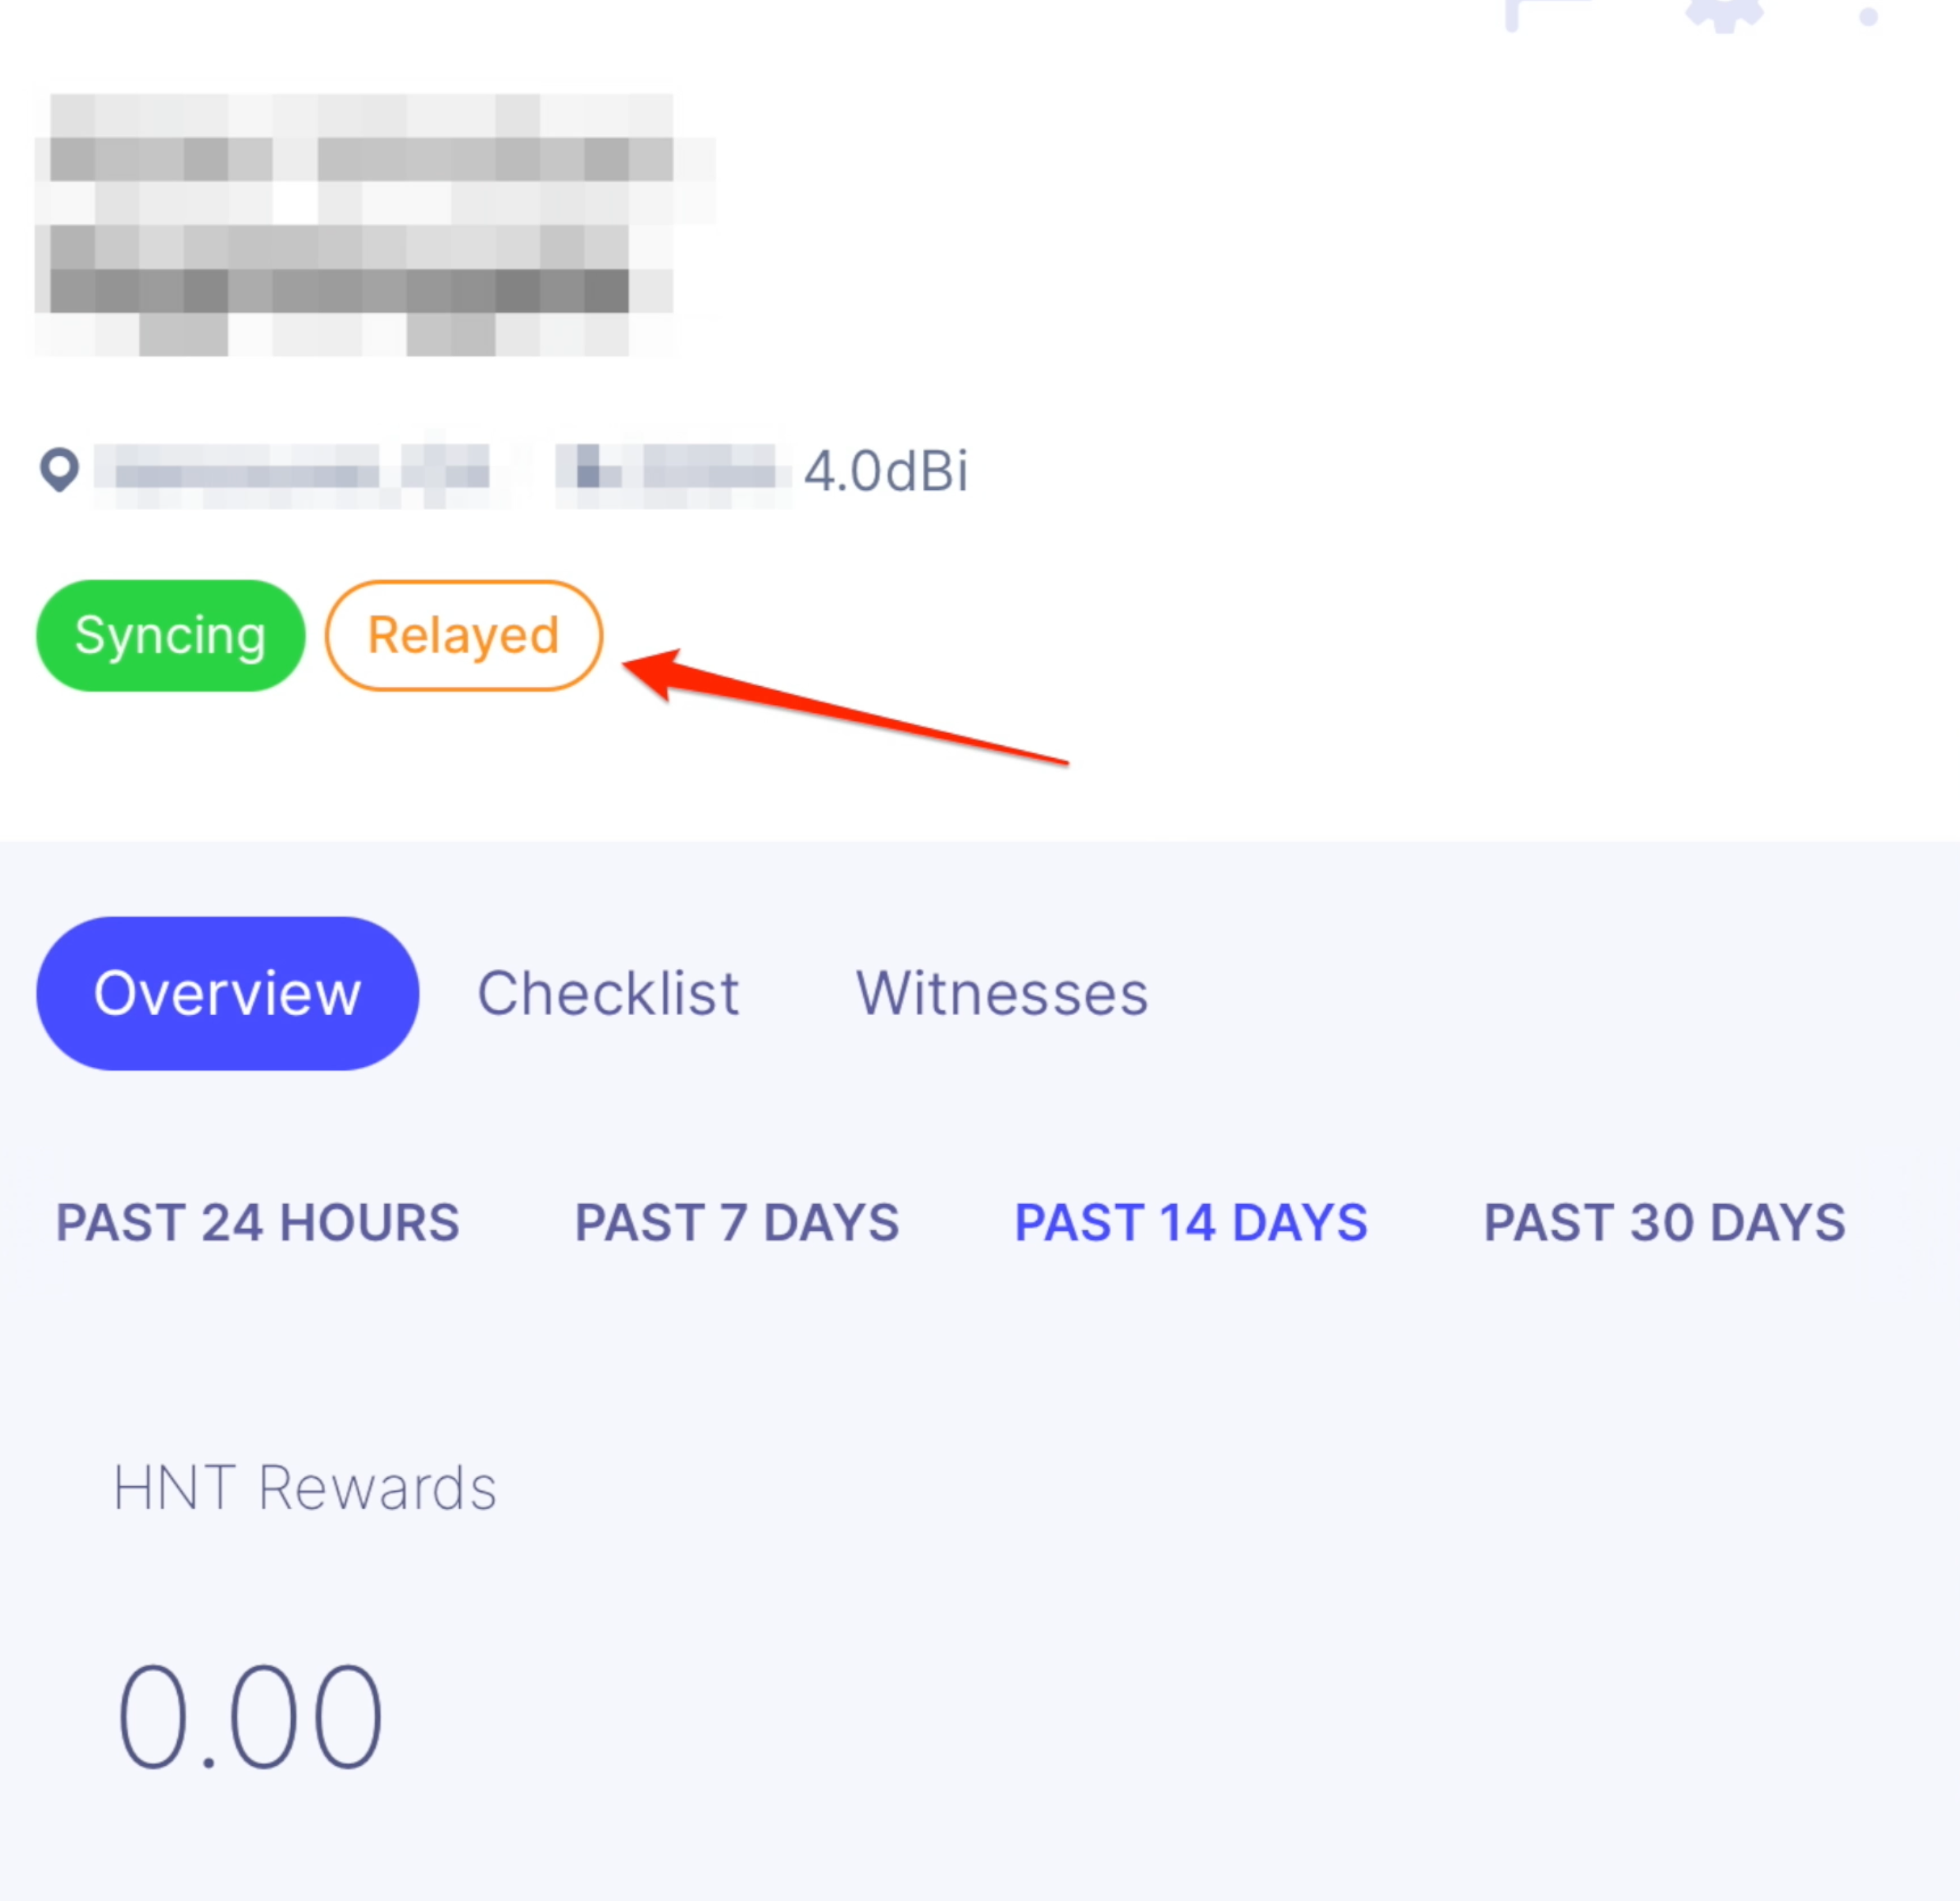
With the excitement, I set it up at a friend's place, set it overnight. Thought I could start earning HNT tokens, but little do I know that I woke up with a miner status showing relayed. I'm sure many of you are having similar problems.
In this post, I want to include everything that I know that helped me solve my relayed status issue. I have successfully solved the problem and I want to show you guys step by step how you can solve your problem as well. Do me a favor, if this video helped you out or helped you solve your related status issue, simply share this post to your friends who need help with relayed status, so many others can benefit from the info presented in this post.
Preparation
First of all, what I recommend you guys to do is to log into your helium app. Assume your miner is officially set up successfully and it's loaded on your helium app and you have your wallet set up as well. So open up your app and enter your PIN. I recommend do have a PIN there just in case you lose your phone one day and you pick the miner that has the related issue.
As you can see here, I have this specific miner. I actually had two of these miners and it's showing relate issue. And if you click on this yellow icon and it will pop up a window, if you click on the troubleshoot, it will direct you to this helium troubleshoot page. So basically you can give it a read. But what we need to understand is there is one Port we need to open.
The port is called 44158. So basically we need to log into our router and create this exact Port. I'm going to show you guys step by step. Matter of fact, I have two different versions of the WiFi router so I can show you guys each WiFi router is slightly different because we're in different country, we have a different router and different brands, but the fundamentals are the same. Okay, you just need to understand how to do these steps.
Run Diagnostic Report
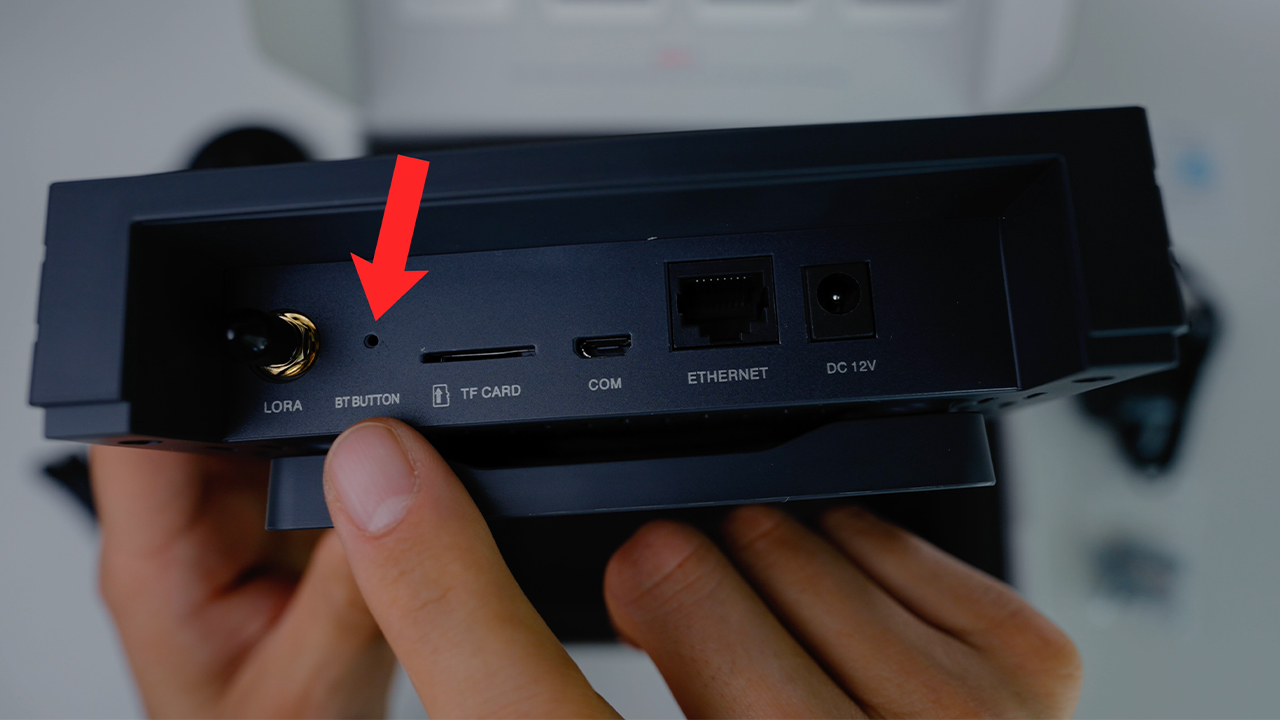
First of all, it's really helpful to run an in-app diagnose. So what you do is locate your Bobcat miner at the back. You're going to see a small little pane hole. It's called the BT button stands for Bluetooth button. You want to insert the pain that comes with the package.
So push this small little button with your pain for about 5 to 10 seconds until your Bobcat miner indicates a blue light. So when that happens, we have turned on the Bluetooth mode. So once you turn on the Bluetooth mode, you want to locate the miner on your app. You're going to see in the middle section we have this wheel icon. That's the settings icon.
Click on it once it will load up this screen. This is three different options. Plus at the bottom it says Pair. You want to click on this blue pair button, give it a few seconds. As long as you have a Bobcat miner Bluetooth mode on it should scan it and do its job and find exact miner that's set at your place.

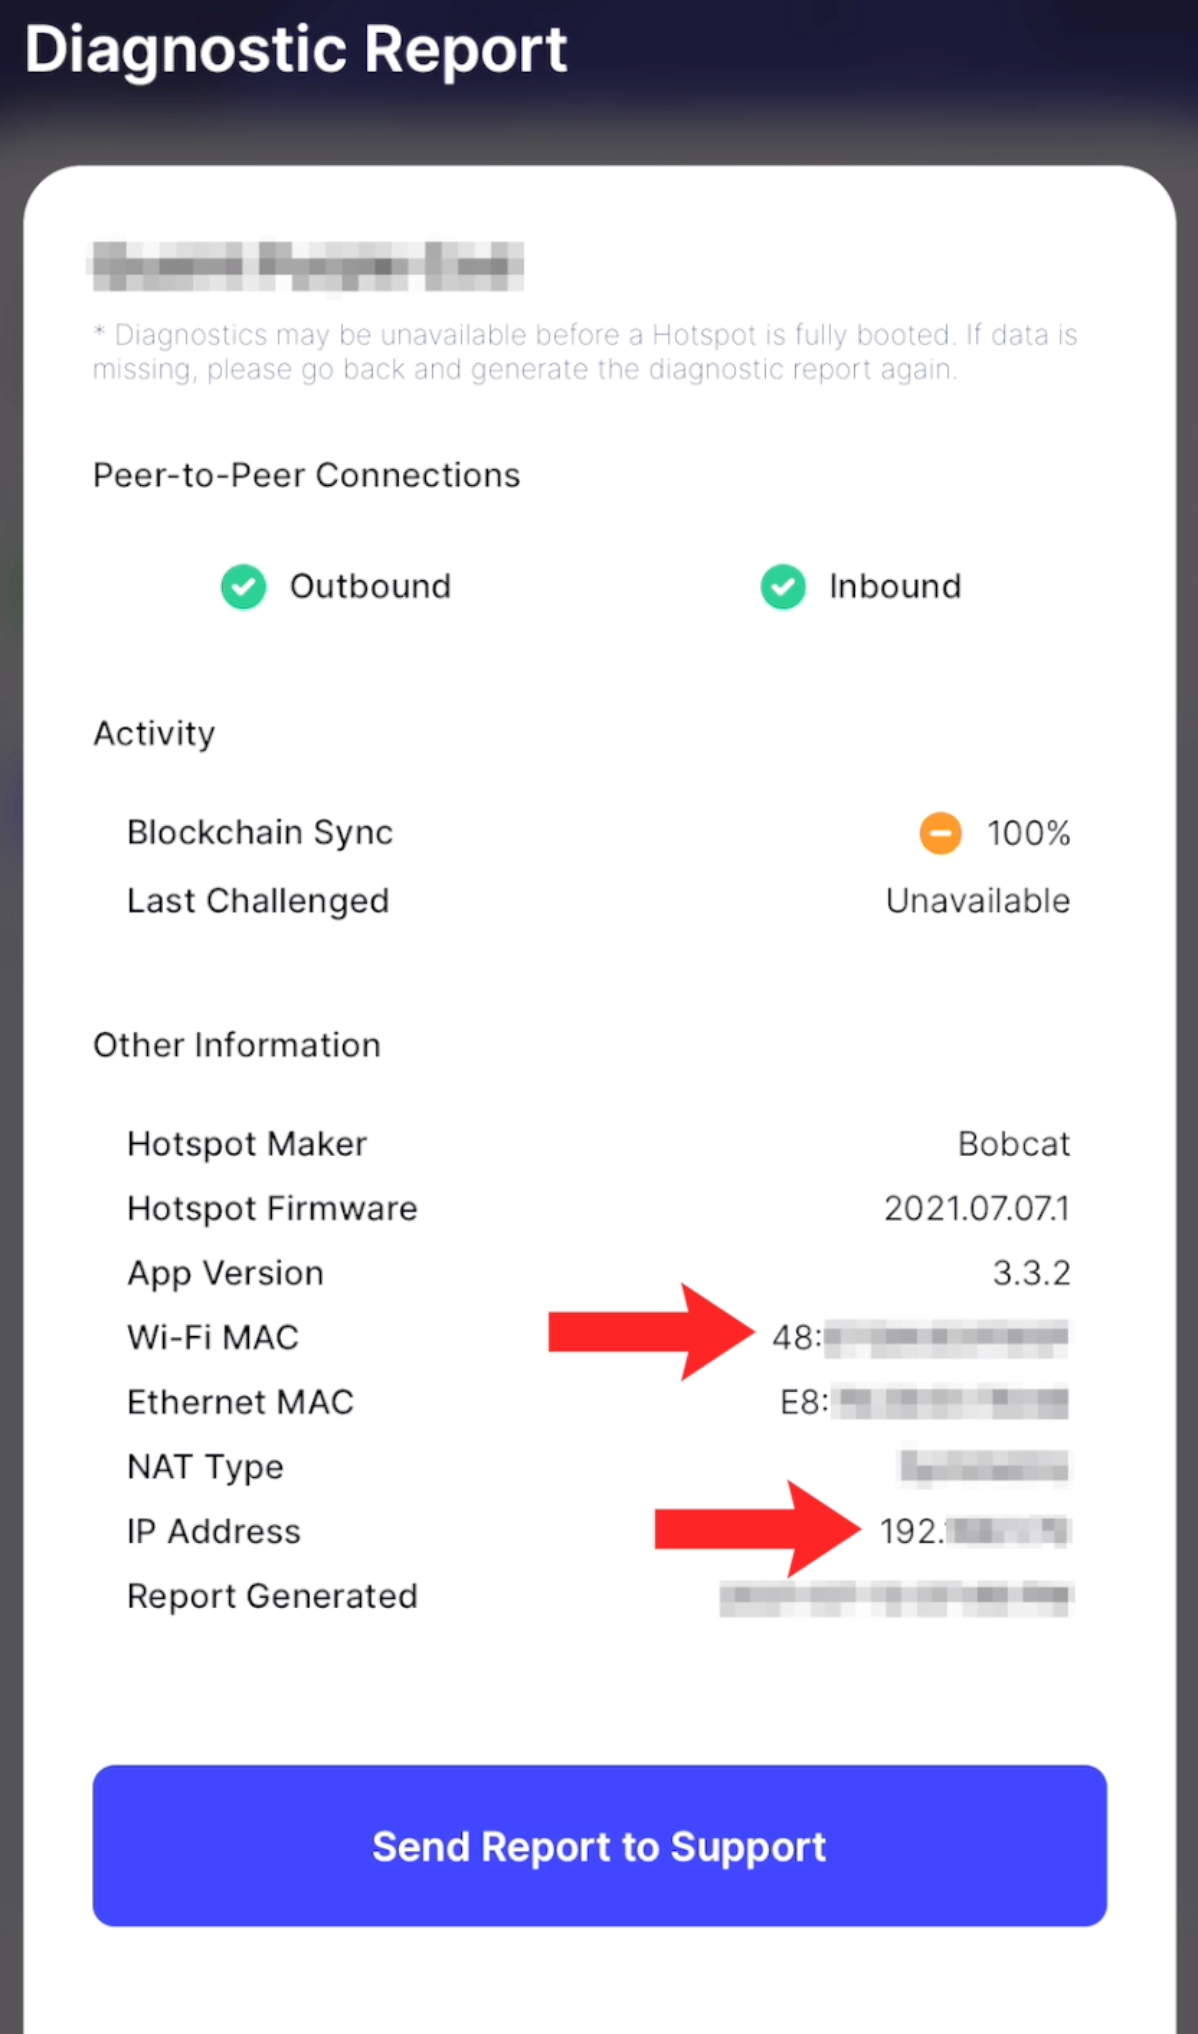
You want to select this miner and then you're going to see three more options you want to pick. The first option says Diagnostic. So it should bring a report out. Basically you can see the connection, the outbound and inbound connection you can see the syncing status. What I do recommend is just to screenshot this entire screen because in a bit we're going to use the IP address on your Bobcat miner.
We're also going to verify the WiFi Mac address. So these two are really important. You will see what I mean just in a bit. Just do a screenshot and that's all you need to do. And now what you need to do is you want to go to locate your WiFi router.
Login to Wifi Router
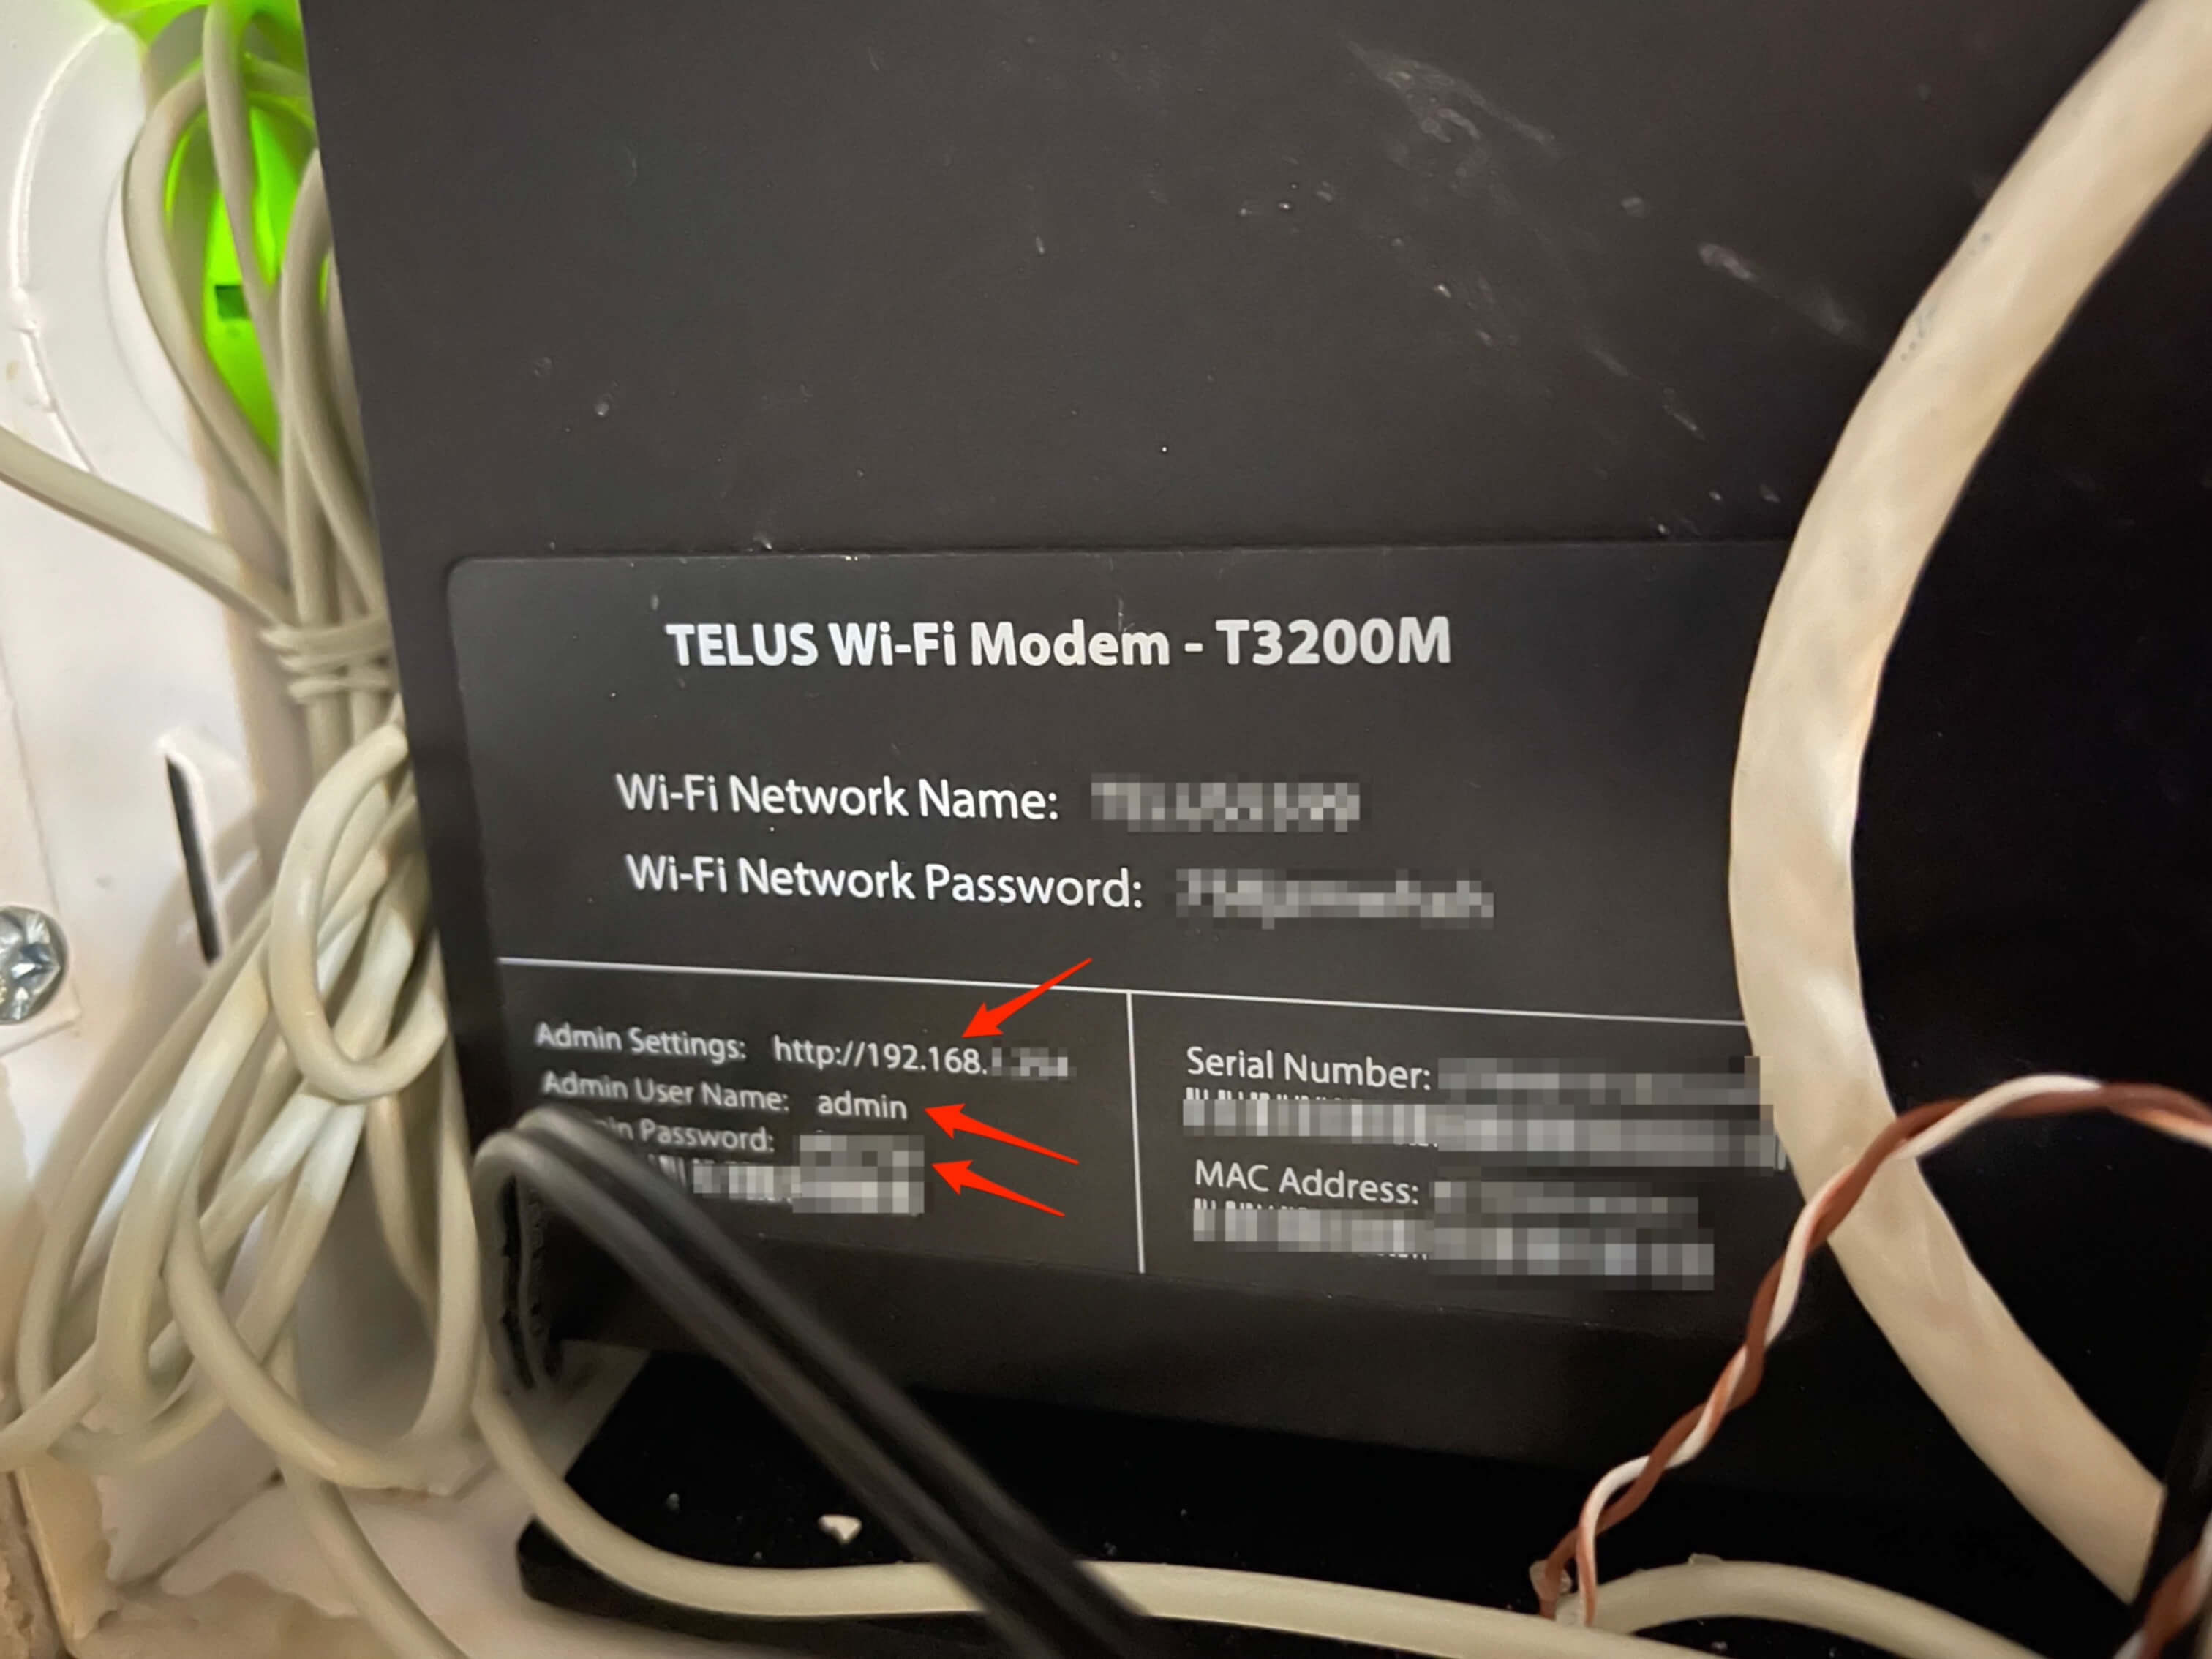
One of the WiFi routers I took a photo here. In the bottom or at the back you're going to see the WiFi router model number and your network name and password. At the bottom you're going to see this admin settings and admin username and password. This IP address usually starts with 19216 eight. Some other numbers you want to use this to log into your local network to configure your WiFi router.
It's written on this router at least a couple of the routers that I've seen, they have their password attached to it. This is first of my friends. This is one of the companies in Canada. It's called a Telus.
Port Forwarding 44158
You can see we have logging to the back end and you need to insert your username and password to log in to the back end to do all the modification and settings after you have successfully logged in.
One thing you need to be aware of is our dashboard might look slightly different because they're designed by different companies, but again, you want to kind of look around and flip with the different menu settings. The majority of these settings, the first one you want to go to is called a firewall. So once you locate the firewall you want to click on it once. So you can see here under the firewall we have a few menu items. The one we want to go to is called the Port forwarding and you can see here I have this Port forwarding opened and you can either manually enter the IP address or you can select the device again.
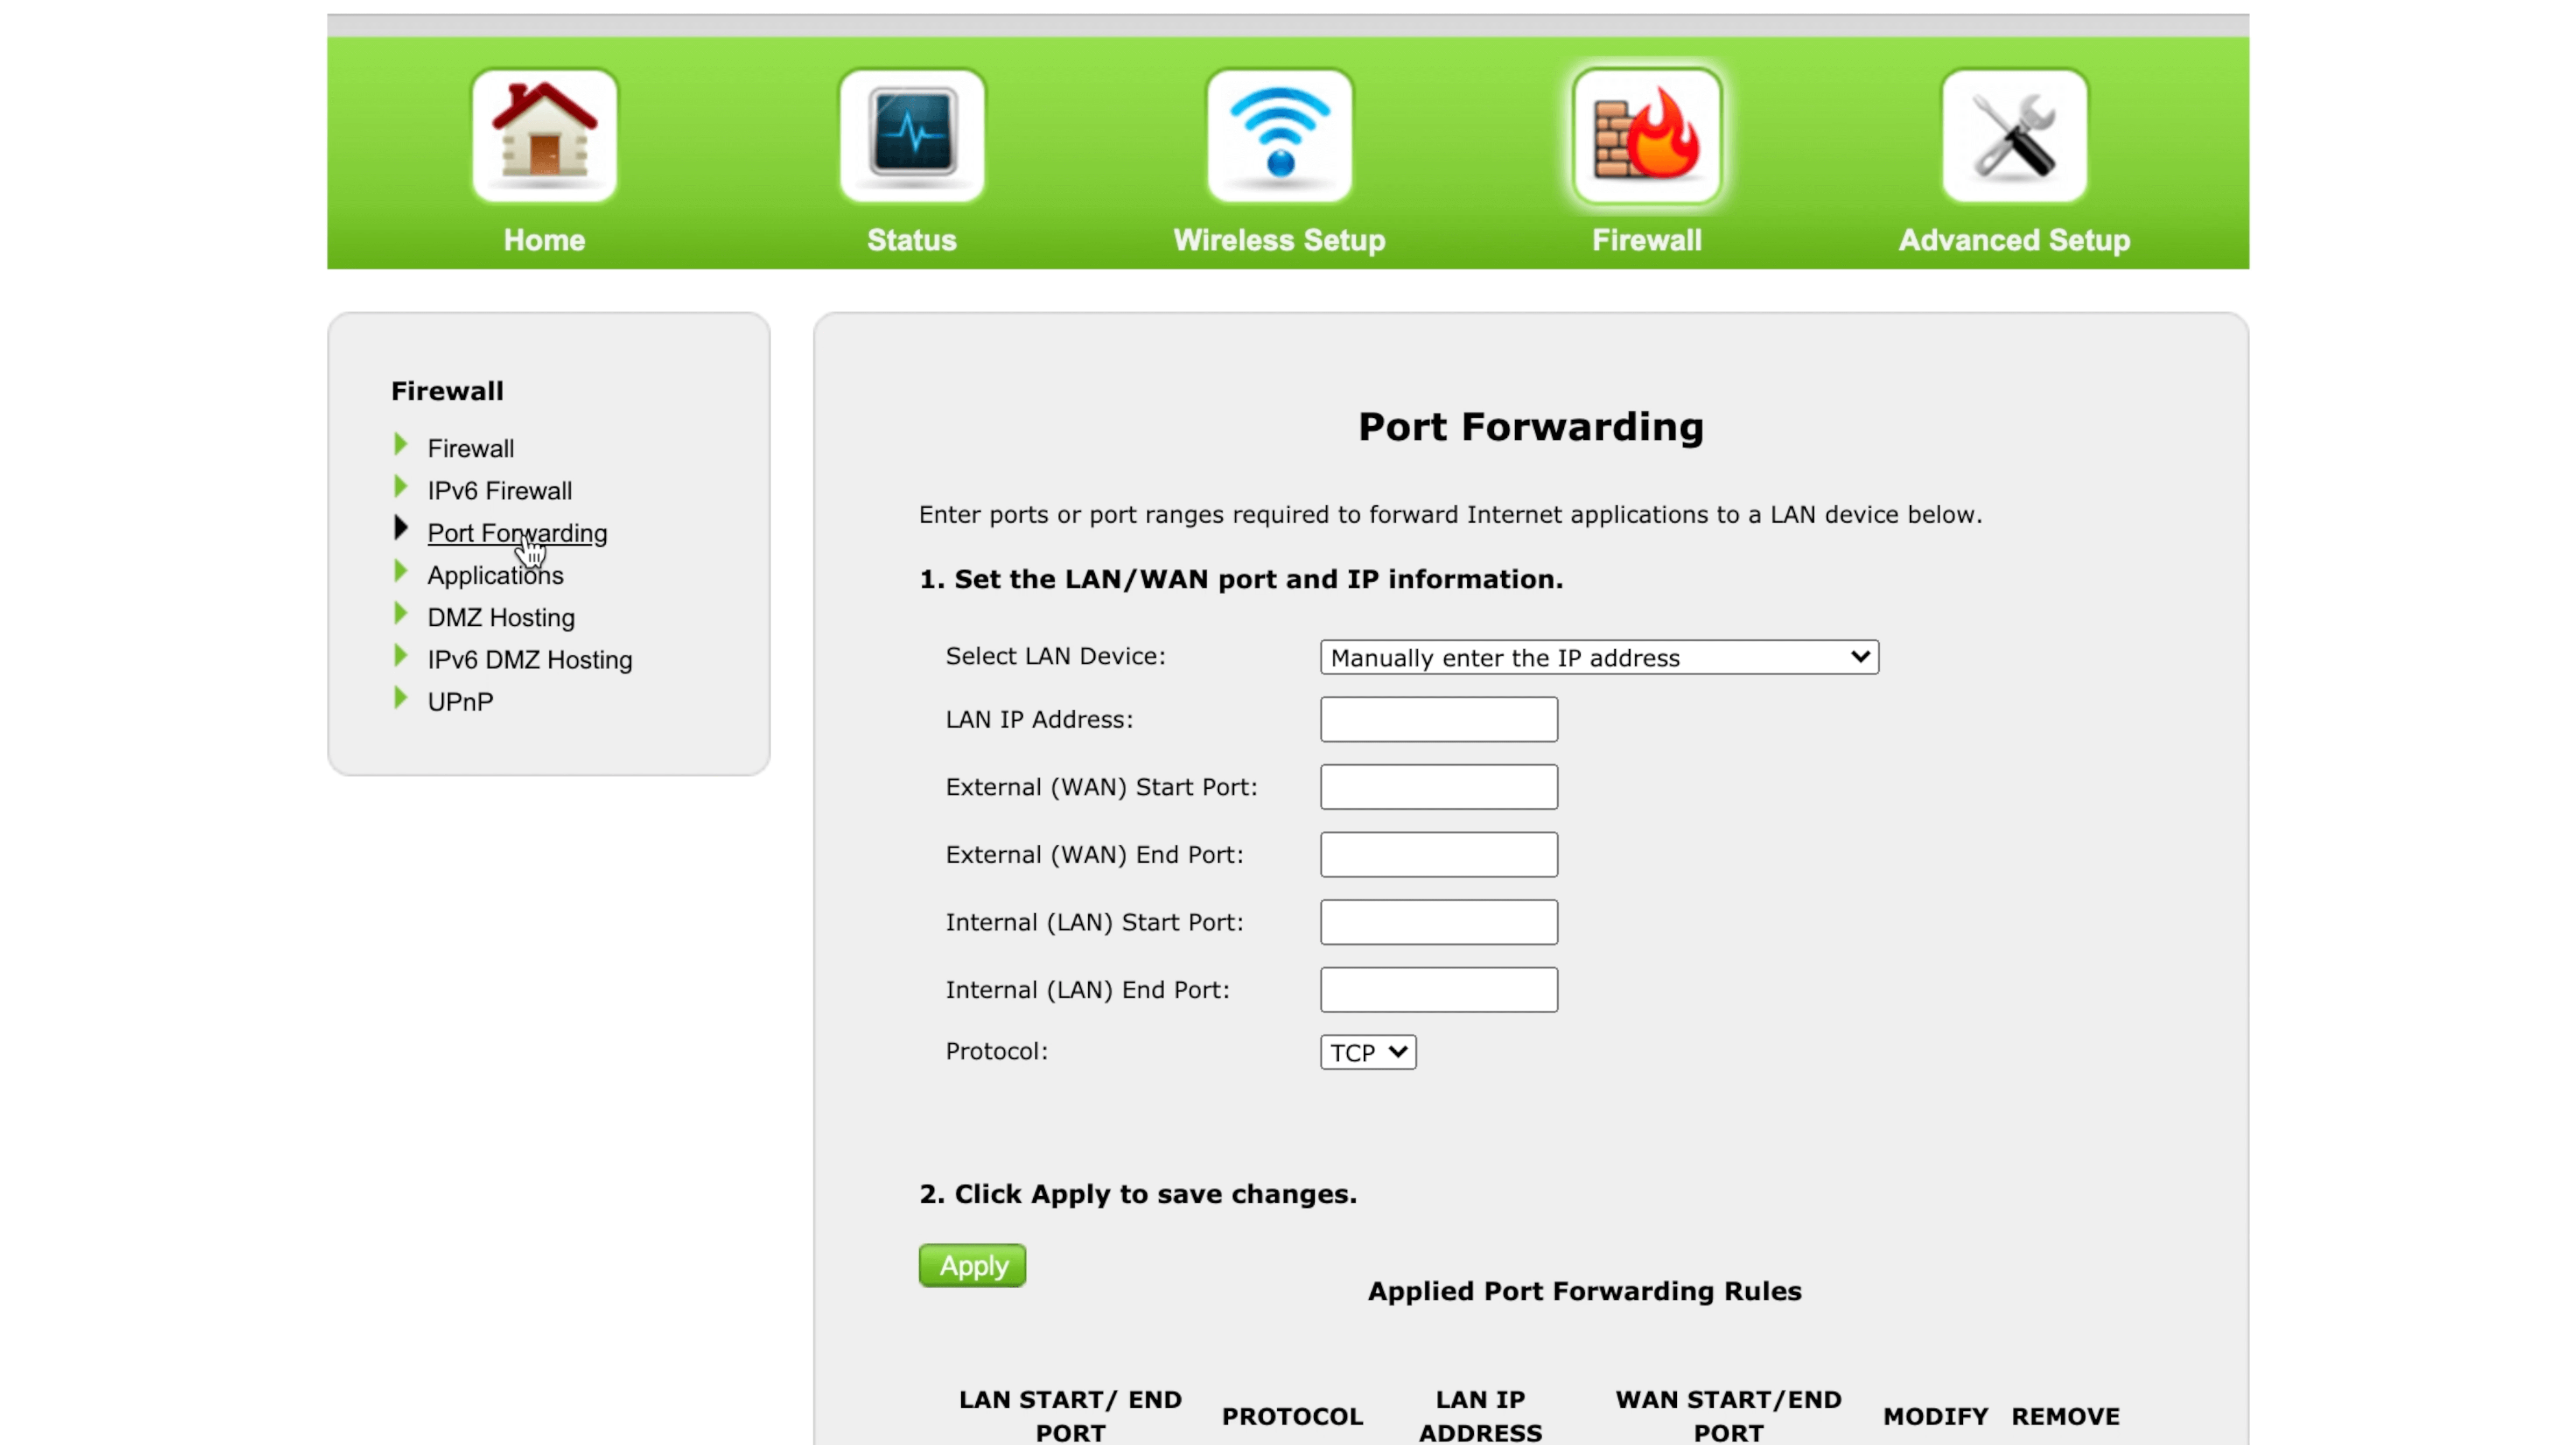
Some router would let you manually type in there and some routers would already populate to you. The local connected devices in here. If you have your Bobcat Miner successfully set up, you should be able to see Bobcat miner option. The reason we ran a diagnosed and took a screenshot of the report earlier is because the IP address should be the same here as the Bobcat miner. If you have to manually type in the address, that is the address you want to fill in here.
However, if you do have a drop down like this, let you select the device. Simply locate the Bobcat Miner and click on it once and you want to select this device in the Lane IP address. It will automatically fill in there. Again. If you want to manually do it, enter the exact IP address from the report and now in the Start Port you want to type in and in the end Port you want to do 44158.

Basically you want to do this four times star Port and end port. You want all filling 44158 and a protocol. You want to go with a TCP. That's what you want to go with. When you're done with this step, just click on Apply or Add or any one of these buttons that's on your router settings and then you can see at the bottom we have applied a Port forwarding rule.
DHCP Reservation (Static IP)
We're not done yet, we're almost there. So the second place you want to go to is something called reserve a static IP address meaning you are telling your local network that your Bobcat Miner is having a static IP address. So it's not moving the IP address, it's confusing the entire helium network. Basically, you want to reserve or associate one static IP address to this specific miner that's connected to your local WiFi. Okay, so it won't jump around.
So what do you want to do is flip through your menus. They might have a different names here and there. So what I actually find out is when I click on Advanced Setup on this specific friend's network, I have to click on Proceed. I am an advanced user and then after logging into the advanced mode, I found this specific option called the DHCP reservation. So you can find some similar language.
Basically they should give you a description to tell you hey, this setting is for you to associate or attach to a specific static IP address to your device. A lot of the router that I logged into, I found the same option called a DHCP reservation or Reserve. You can see here we have a drop down menu. Again, we can select the Bobcat miner. Or if you don't have that option, simply manually input an IP address.
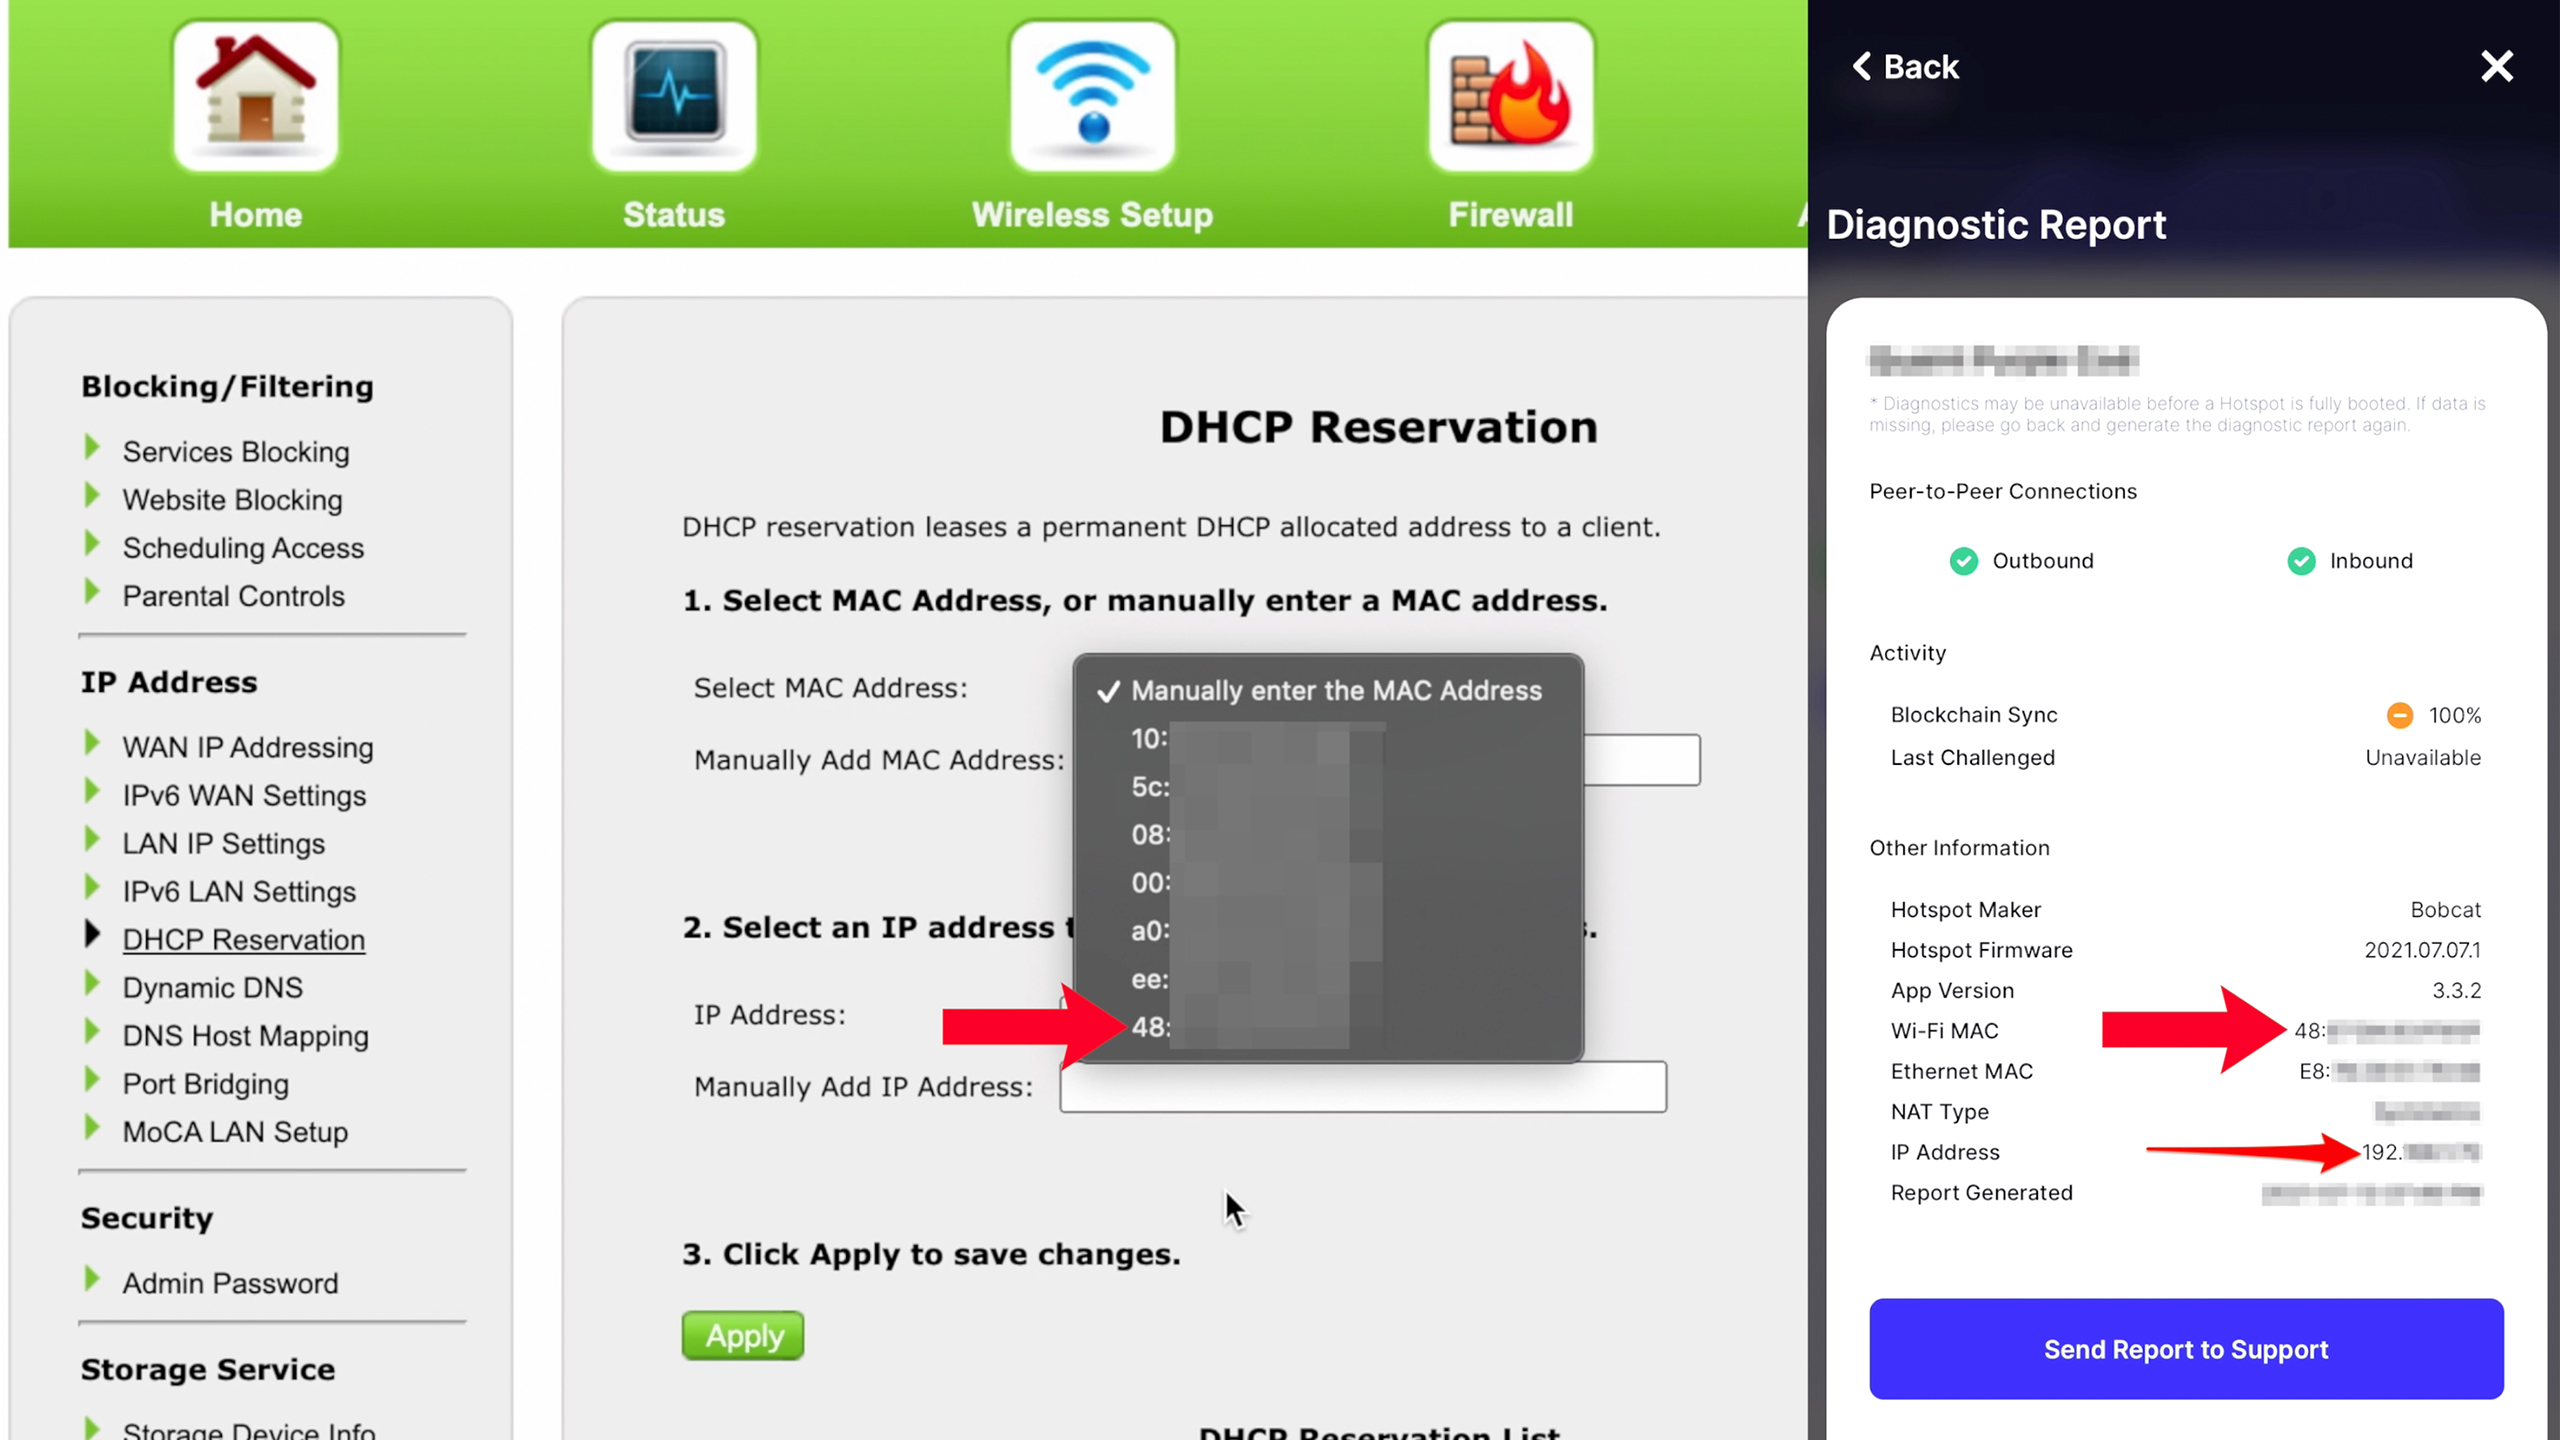
This IP address should be the one on the Diagnosed report that you took a screenshot earlier. There's another scenario that could happen. Is it's asking you for the Mac address? This is also located on our Diagnosed page. We took a screenshot earlier.
You're going to see the Mac address can see here in this specific option. There's a whole bunch of codes here. I really don't know which one is Bobcat Miner. That is why I ran a diagnosed report earlier. So now I know which one exactly is a Bobcat miner.
Just locate this Mac address. Again. If you have the device option that's showing you, then just go for it. If you don't, then there should be an option to ask you for an IP address. If you don't see that option then it's probably asking you for a Mac address.
Select that specific Mac address which is associated with the Bobcat miner. And now I have the second option says select an IP address you want to associate with this Mac address. There is going to be either a drop down menu for you to pick from. If you can locate this one, that's great. If you don't, then there should be a menu adding IP address field.
In here, this IP address is exactly the same as the Diagnosed report. We took a screenshot earlier. Just simply pick or manually input the Bobcat miner IP address. So pretty much that's all you need to do. And from there you want to click on Apply or Add.
And you can see here at the bottom DHCP reservation list. I have Bobcat miner and I have the Mac address associated with it as well as a static IP address that's associated with this miner. So from now this will be the static IP address instead of the dynamic one that jumps around when you move around. So that's all you need to do. After these two steps are done, you're pretty close to finishing line.
However, I talked to a few experts on the Discord group some of them told me that there's another option you might be able to find on your router back end here. It's called a UPHP. So this option they recommend it to disable it or turn it off. Okay, so however I do recommend you guys to maybe just do the first two steps and to see if your status actually gets fixed. If not, then eventually you can come into the up HP and just turn that option off.
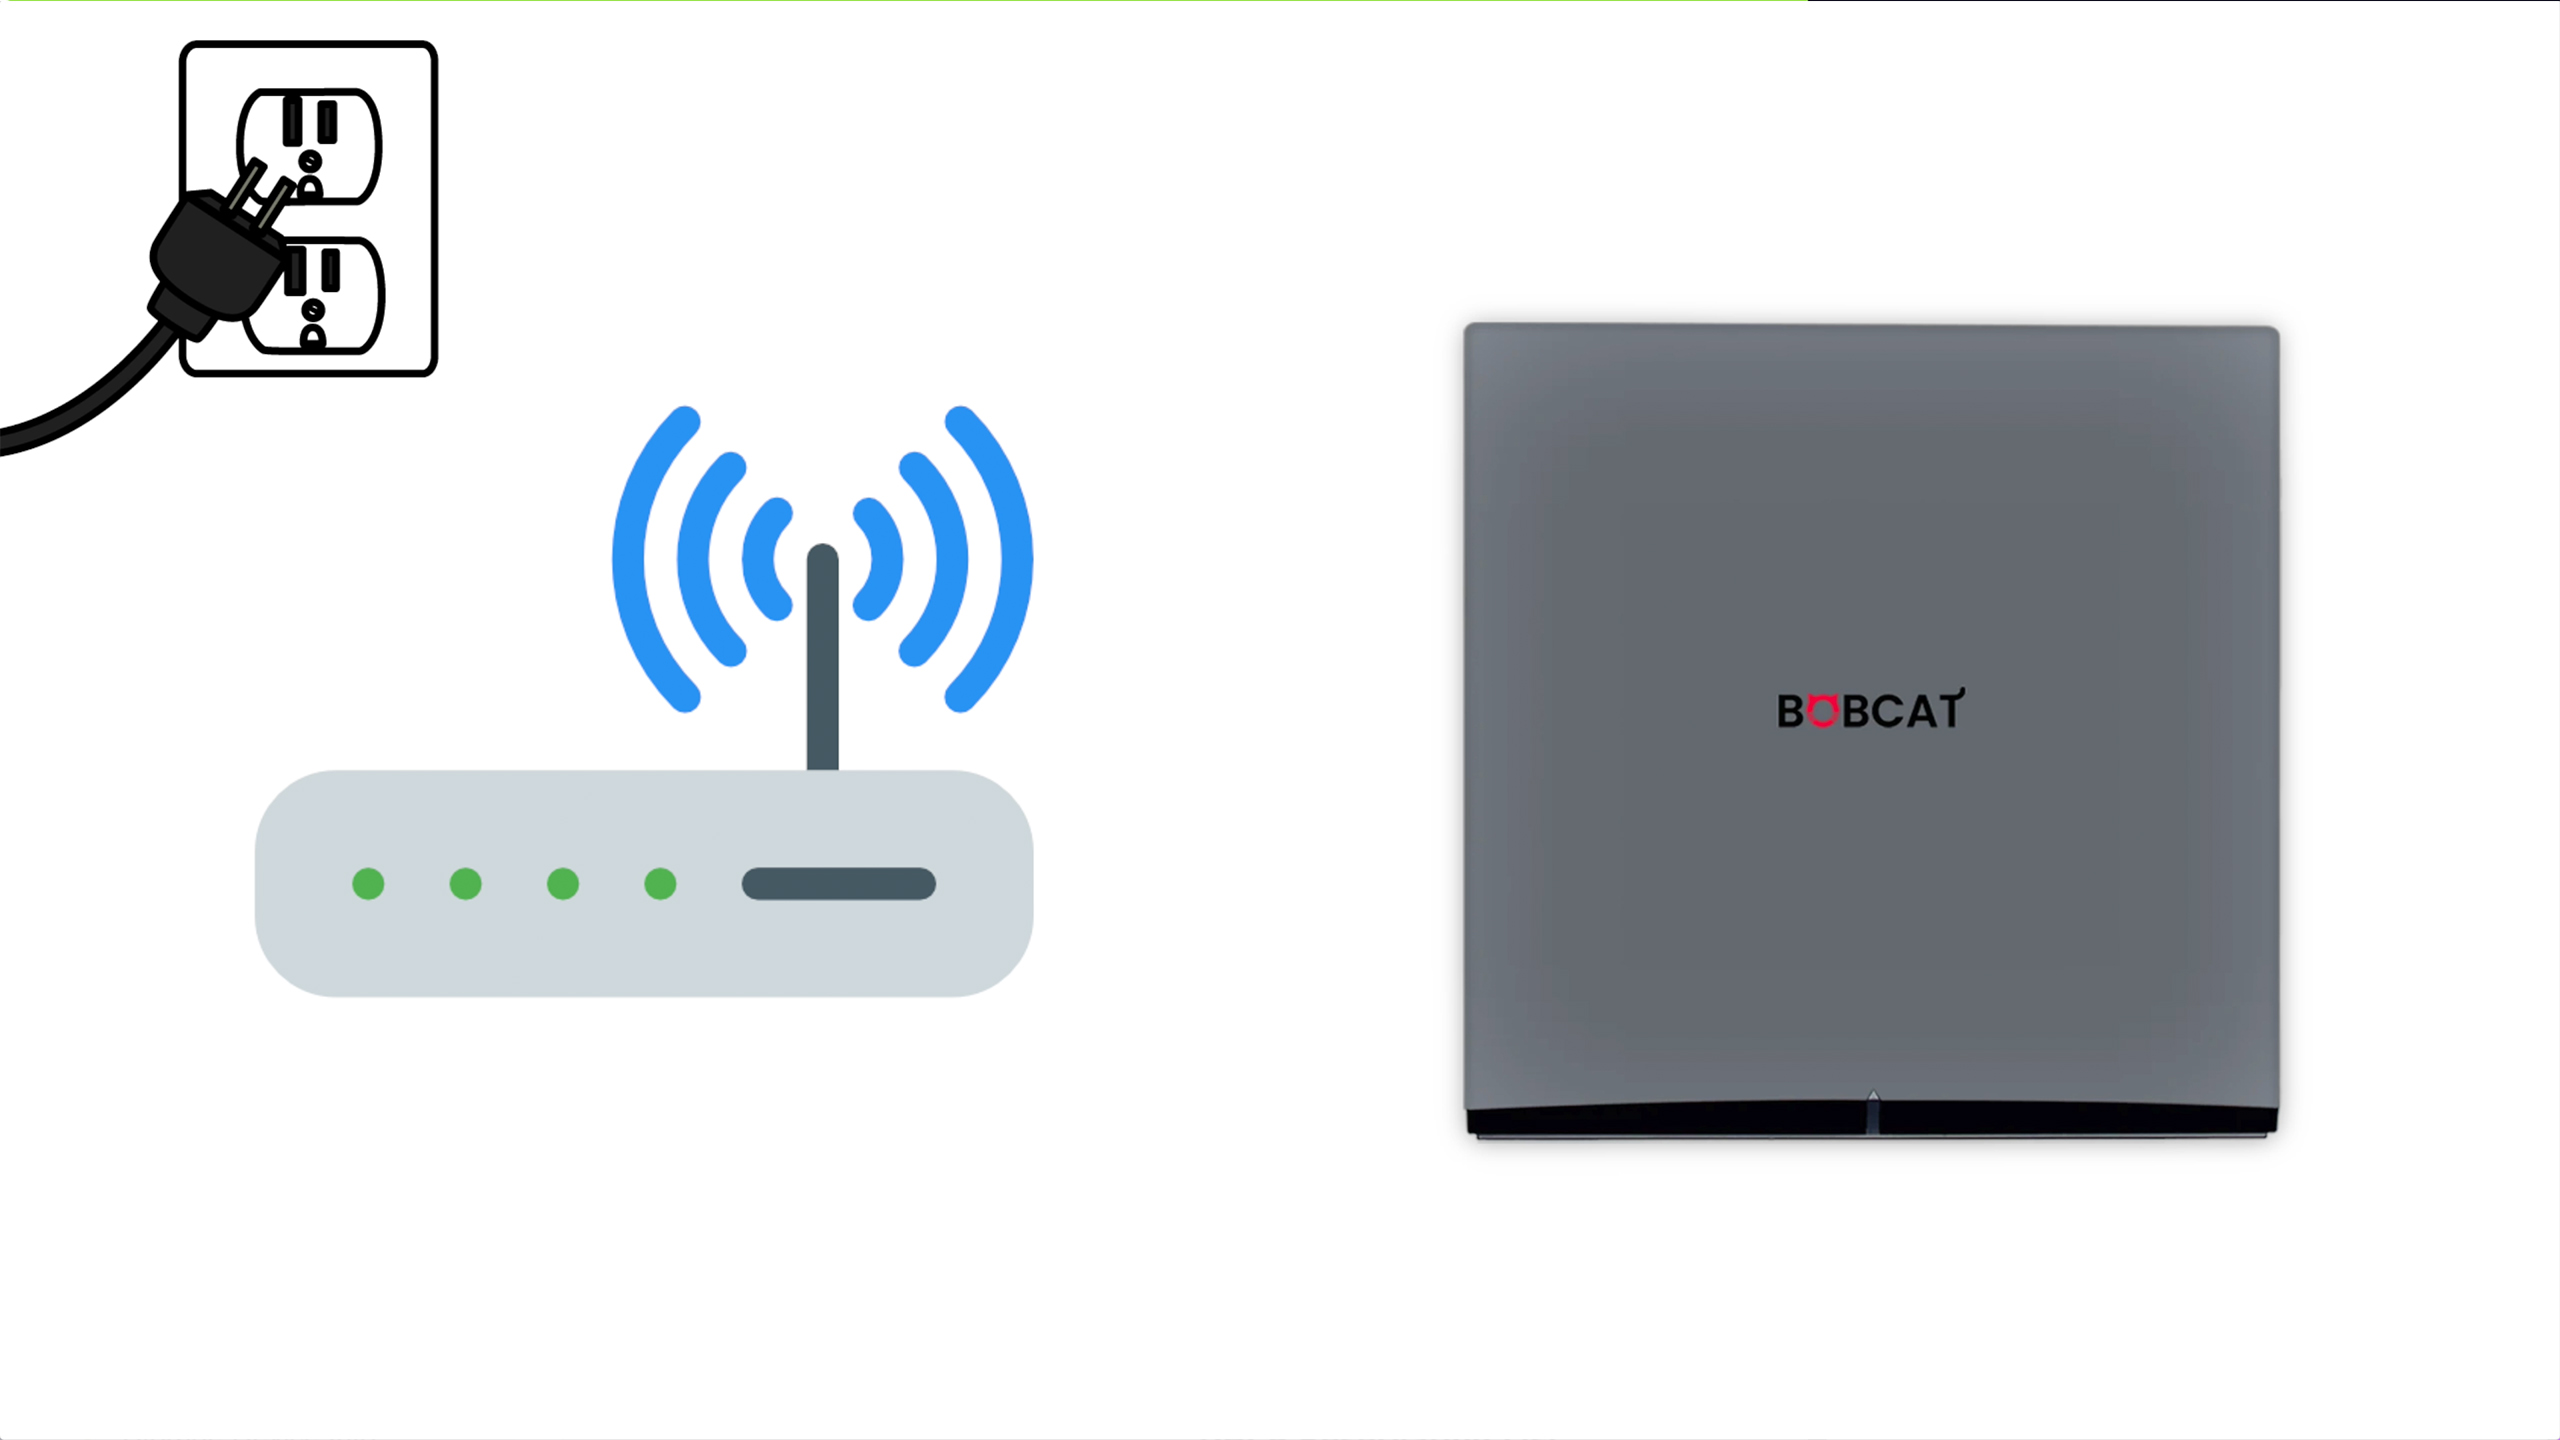
That's all you need to do after you finish all these steps. What you can basically do is to restart your WiFi router as well as your Bobcat miner. So in my case I asked my friend to unplug the WiFi router and wait for a few seconds and plug it back in as well as the Bobcat miner, the Helium miner. You want to unplug it and wait for a few seconds, plug it back. That should restart everything and to apply the configuration we just did to the miner.
Port Checker
After you have done everything, what you want to do is you want to come to a website called the Port checker co the link is in the description. You can find it there. So once you come into this website it should automatically load your default IP address. Just leave this field as is in the Port number field. You want to change whatever it is on it to 44158 and the rest you just leave it as is this FTP 21.
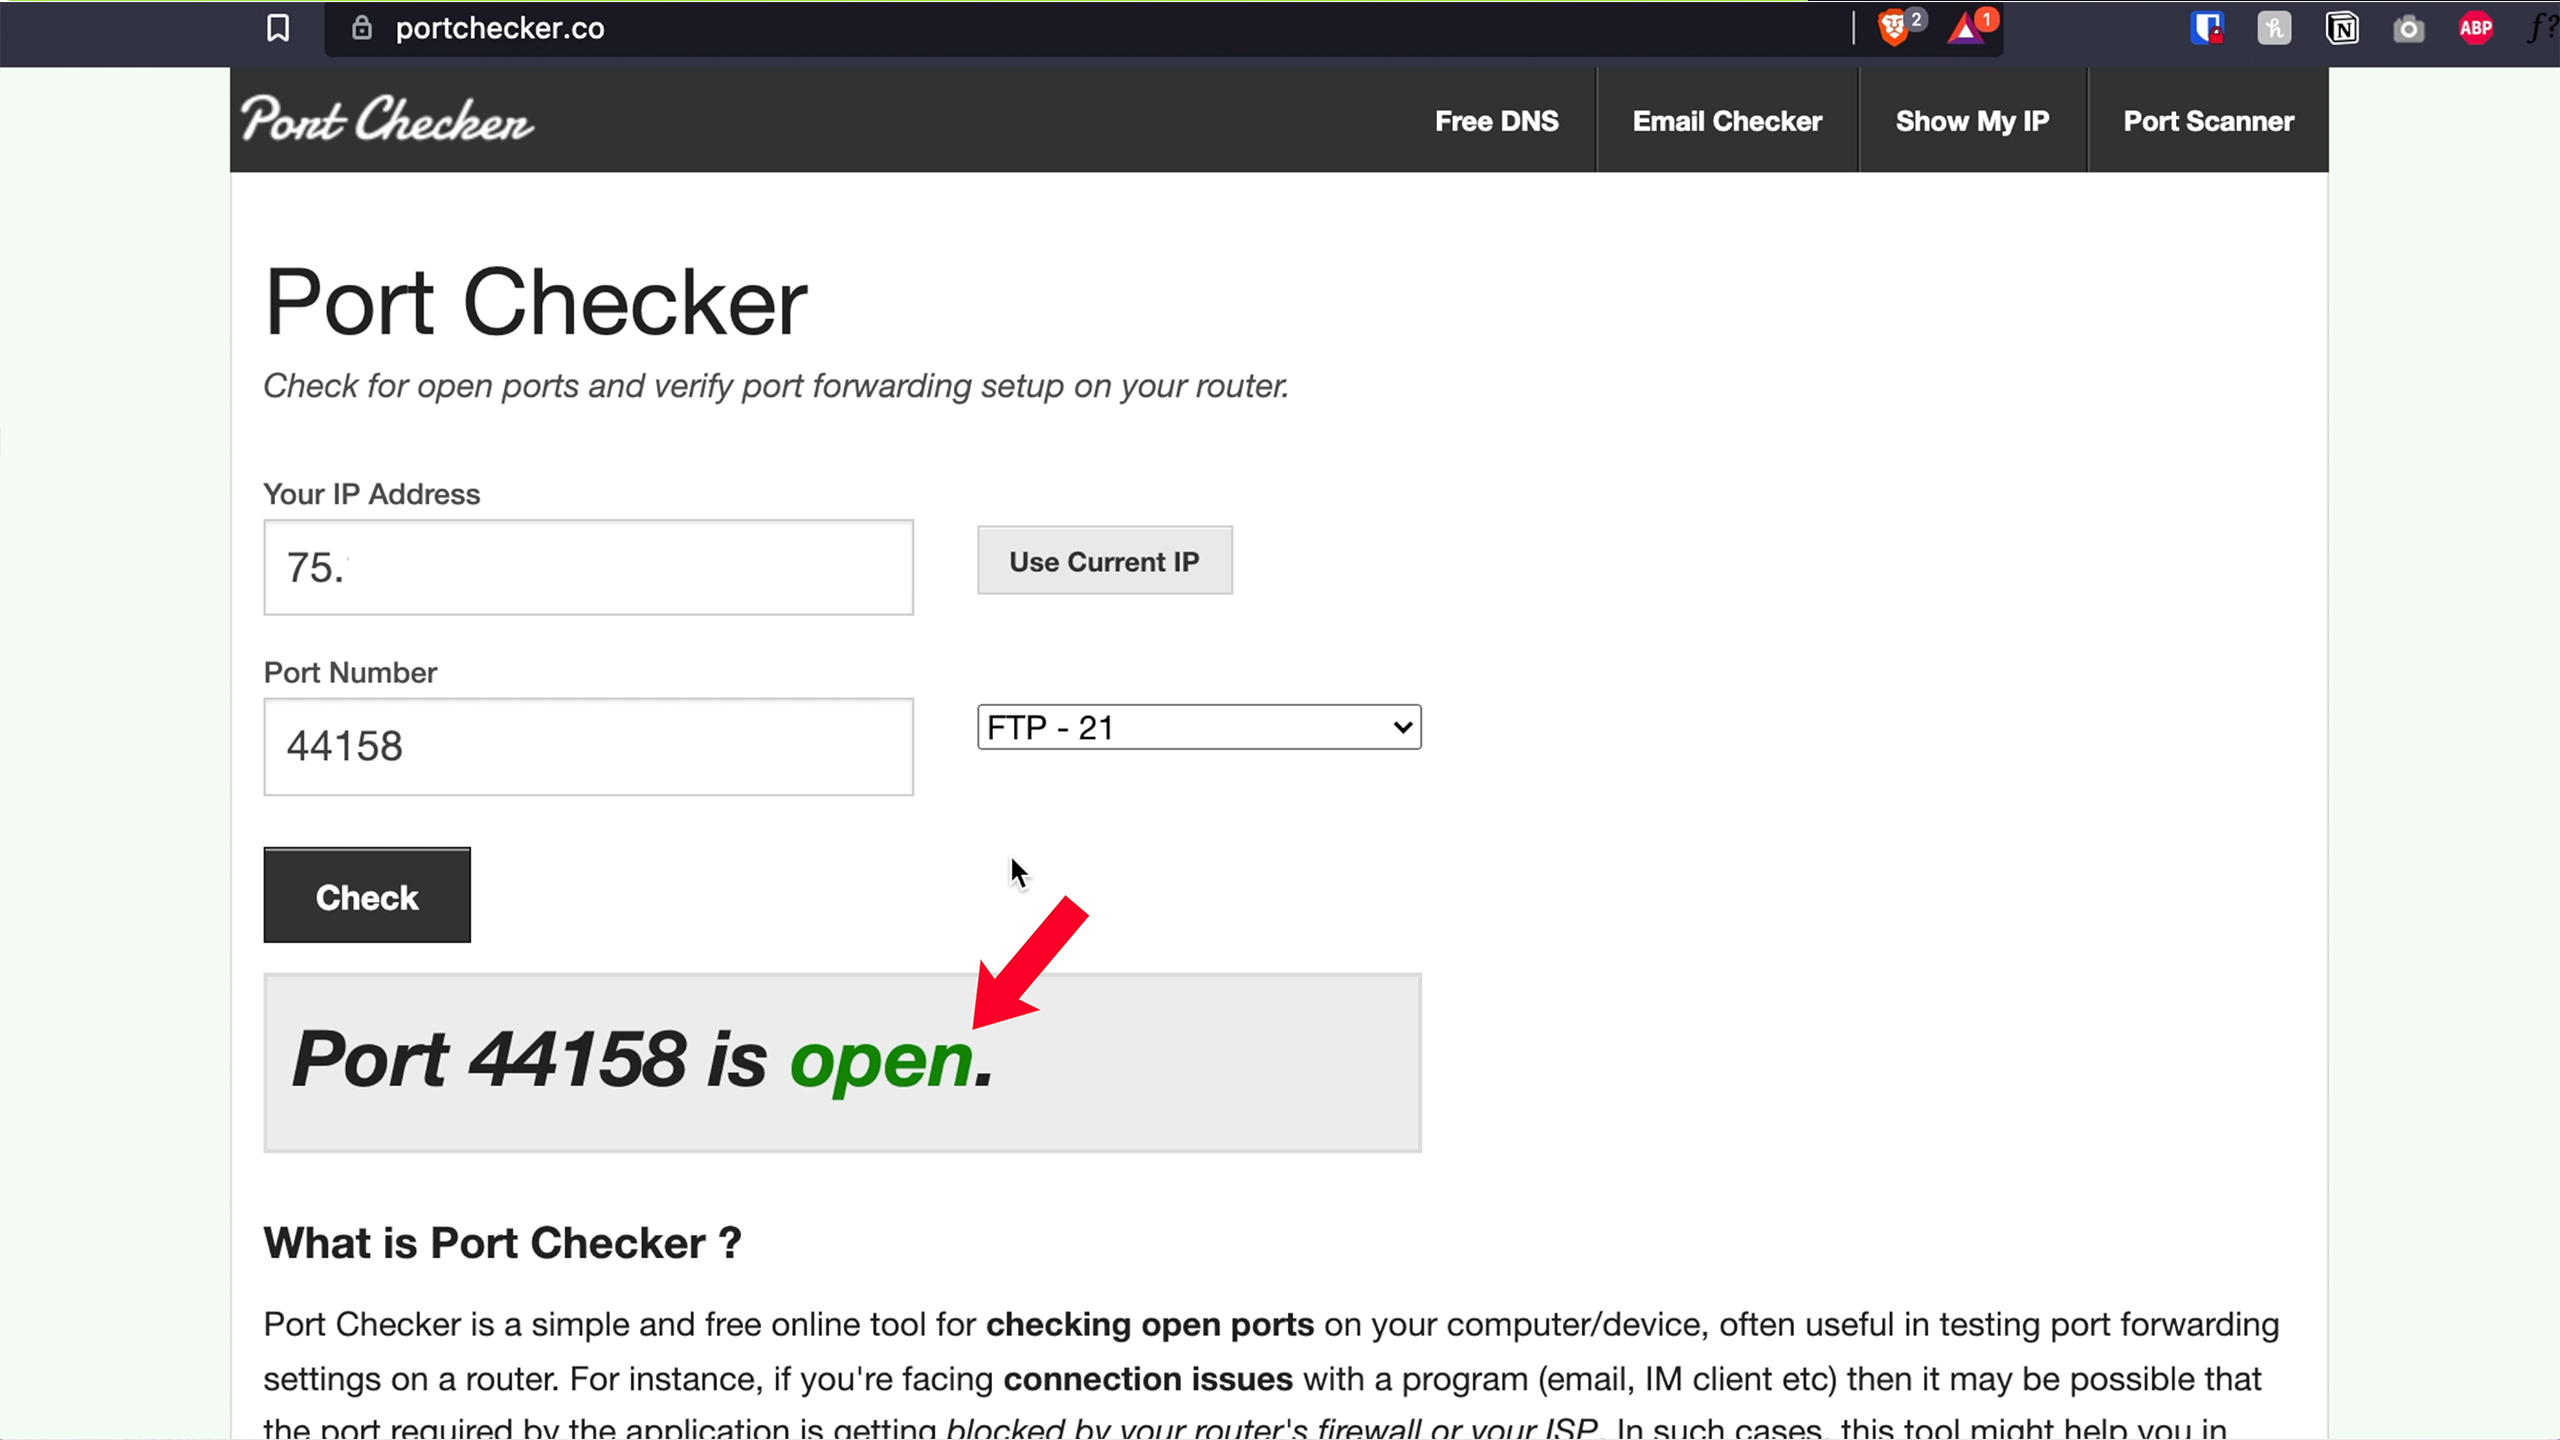
These are some other default options. Just ignore them completely. After you've done that you click on check you should be able to see the Port 44158 is open. Okay, that's a really good sign that you have done everything successfully. So I've done this a couple of times at the two different places of my friends.
I'd recommend you to do Port forwarding plus static IP reserve first and see if the problem goes away. If it doesn't, you can certainly come to UPHP and disable this option. This is somebody in the Helium discord group told me about it. Turn off the UPHP option so when I'm done with it and then the last option is I was able to go under advance again and IP addressing. I was able to locate DHCP reservation.
Patiently Wait
These are some other default options. Just ignore them completely. After you've done that you click on check you should be able to see the Port 44158 is open. Okay, that's a really good sign that you have done everything successfully. So I've done this a couple of times at the two different places of my friends.
I'd recommend you to do Port forwarding plus static IP reserve first and see if the problem goes away. If it doesn't, you can certainly come to UPHP and disable this option. This is somebody in the Helium discord group told me about it. Turn off the UPHP option so when I'm done with it and then the last option is I was able to go under advance again and IP addressing. I was able to locate DHCP reservation.
It might take several hours. In my specific case, I waited about eight to 10 hours. After eight to 10 hours I logged into my helium app and I located the miner that used to have relayed status and then the status is completely gone. So I have successfully got rid of the relayed status. So again from the discord group, some guys are saying that you should fix relay issue.
If you don't, that might affect your mining profitability because basically what relate is meaning is Bobcat is having a hard time communicating with the network. It's relying on some other people's network in order to communicate to your Bobcat Miner. So that is basically what's happening behind the scenes. Hopefully these steps that you followed should be able to get rid of the relayed status on your Bobcat Miner. Maybe sometimes you want to leave it overnight or at least eight to 10 hours I would say because that's how long it took me.
Conclusion
So that's it guys. That's all you need to do to get rid of the relay status on your helium miner. Hopefully this video helped you out if it really did again, drop some comments and give it a like and subscribe to the channel for future content as I want to share more and more healing related video for you guys to show you guys how to do the setups and how the profit earning goes and how to upgrade your antenna and all that juicy stuff. I have many other crypto related videos. Feel free to go check them out.
Stay blessed,
Follow Me
- YouTube Channel: http://bit.ly/38ZZpXf
- Instagram: https://www.instagram.com/tariosultan/
- Facebook: https://www.facebook.com/tariosultan/
- Twitter: https://twitter.com/TarioSultan
- My Bio Card: https://link.tariosultan.com/bio
- All My Gear: https://link.tariosultan.com/gear
More from
Crypto
category


.png)

