


id you know? Around the world, hackers attack happens every 39 seconds. Since 2020 Pandemic FBI reported a 300% increase in cybercrimes.
Matter of fact, 91% of online data breaches. Start with a phishing attack. If you don't know what phishing attack is. Phishing is a type of social engineering where an attacker sends a fraudulent message designed to trick the person into revealing sensitive information to the attacker.
In 2017, Google distributed a technology to its 85,000+ employees, and made it mandatory to use on top of their regular password, and since then, it has reported zero successful phishing attacks.
In this article, I'm going to show you in and out about this technology developed by a company called Yubico, founded in Sweden back in 2007. For less than $50, this hardware authentication device will protect access to computer networks and online services.
What is a Yubikey?
A Yubikey is this small piece of hardware device. It utilizes 2nd factor authentication (2FA), so when you log in to a site, you type in your username, your email and your password. You plug this Yubikey in and tap on the copper connector. It prompts the Yubikey to generate a one time password that's generated on the physical hardware device. In other words, it's much safer way for you to have access to online platforms and websites and prevent hackers from hacking your email and your password.
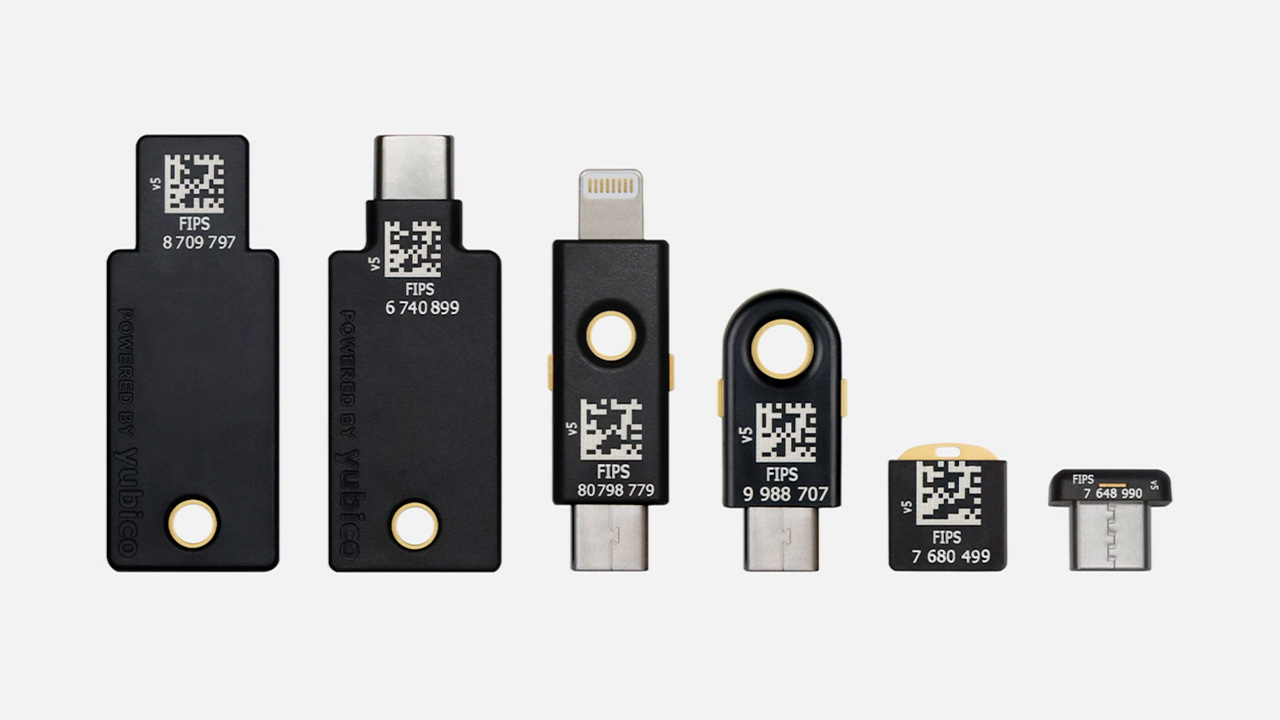
Different Types of Yubikey
Now let's talk about the different types of yubikey devices. Yubico was kind enough to send me these three devices for an honest review. They also carry many different types of devices. It depends on how you use them or what device and computer that you use on a daily basis. Let's look at this first device.
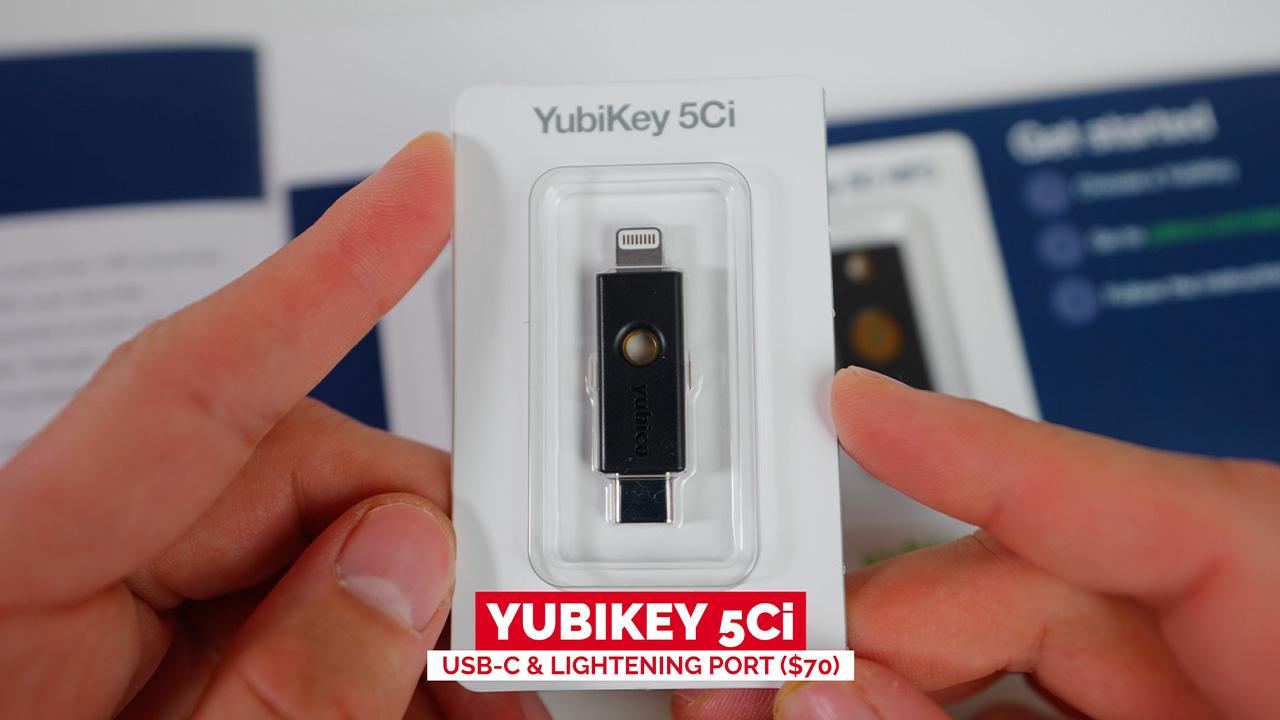
Yubikey 5Ci
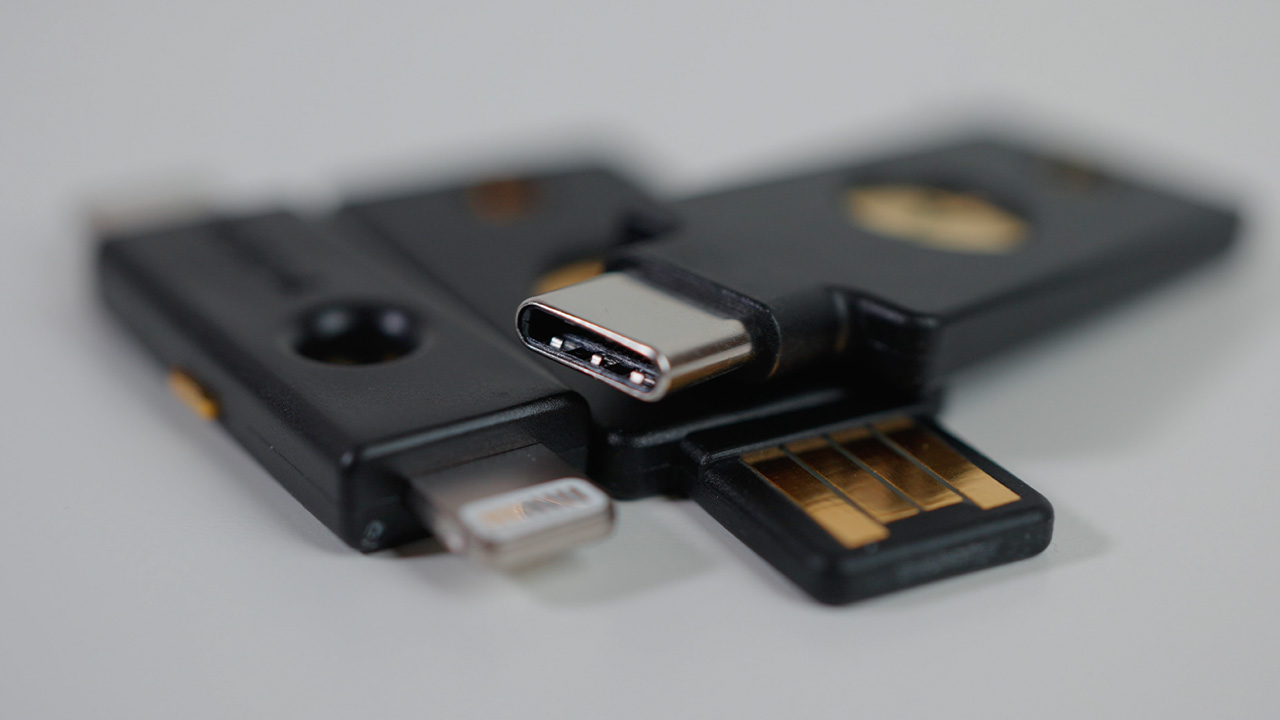
This one is called a Yubikey 5Ci ($70). If you're predominantly iPhone user, this one comes with an iPhone Lightning Connector as well as USB-C Port. You can plug this device into your iPhone or the newer Mac that support the USB-C Port. However, this one doesn't come with the NFC technology.
Key Features:
- Dual connector with support for USB-C and Lightning
- A key that works across desktops and mobile devices
- Fiber-glass reinforced bodies protect key from everyday life
Yubikey 5 NFC
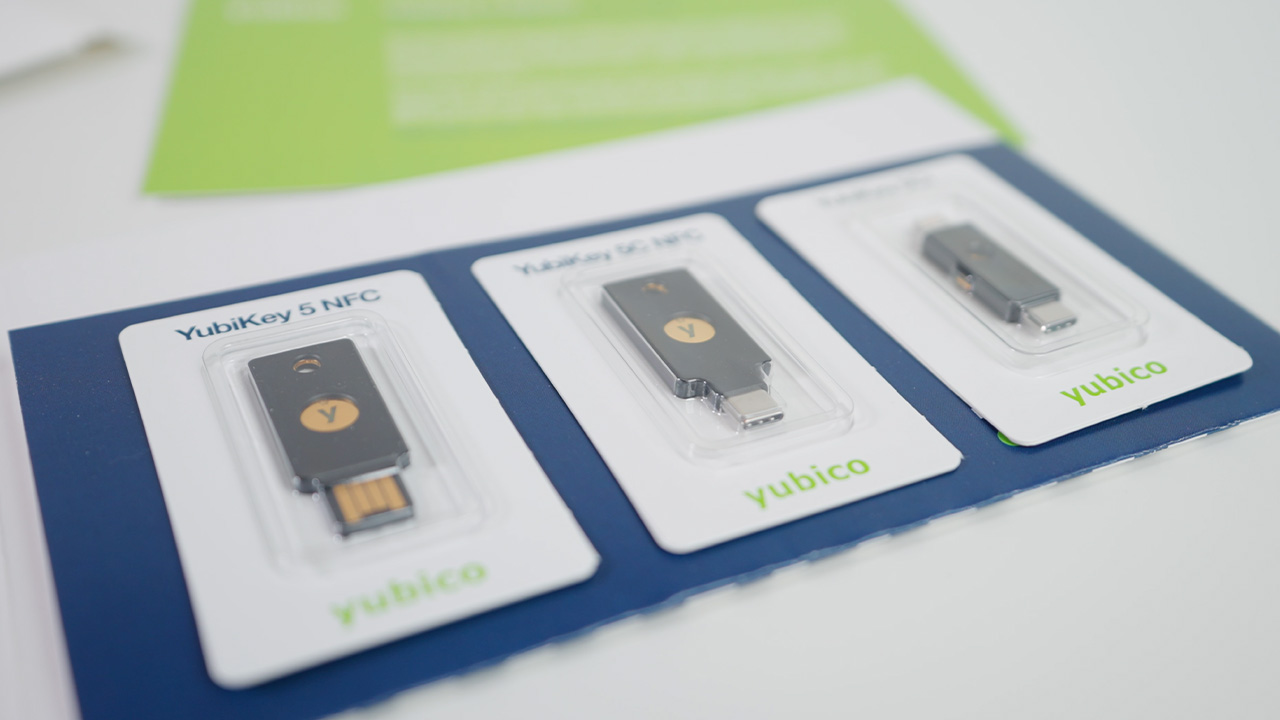
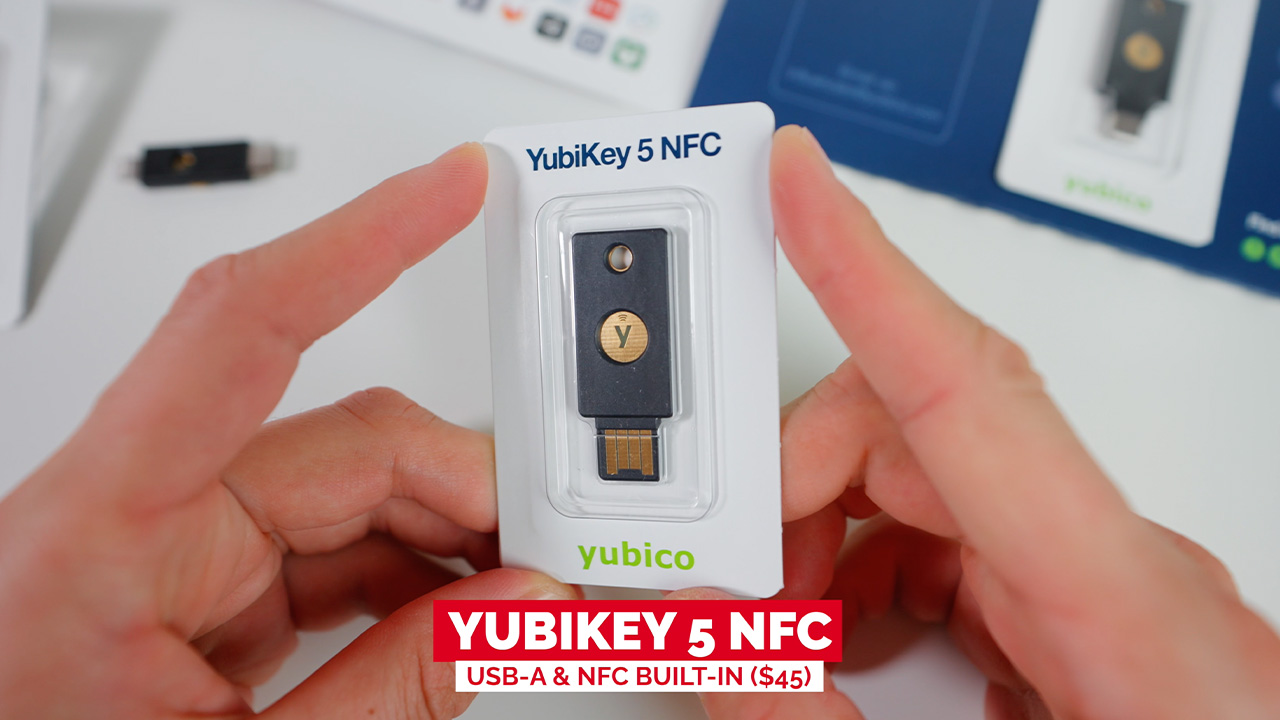
This device is called Yubikey 5 NFC, which is their best seller and one of the most popular Yubikeys.
The retail price is $45. Look around the devices. If you have a lot of USB-A ports on your laptop or your desktop, this one is definitely highly recommended. In terms of mobile application. As long as your iPhone or Android supports NFC, you can tap the Yubikey on top of your phone to authenticate and log into your account.
Key features:
- Most effective way to protect against account takeovers
- Integrates with systems tailored for all business types and sizes
- YubiKey 5 Series works with the most web services
- Near-Field Communication (NFC) built-in
Yubikey 5C NFC
Unlike the second device, this third one predominantly is using USB-C Port and if you're using the newer laptop or desktops, you should be dealing a lot of USB-C ports. That's why this third device comes in handy. Because this third device also comes with NFC, which means you can still use it on your mobile application. Simply tap it on top of your phone.
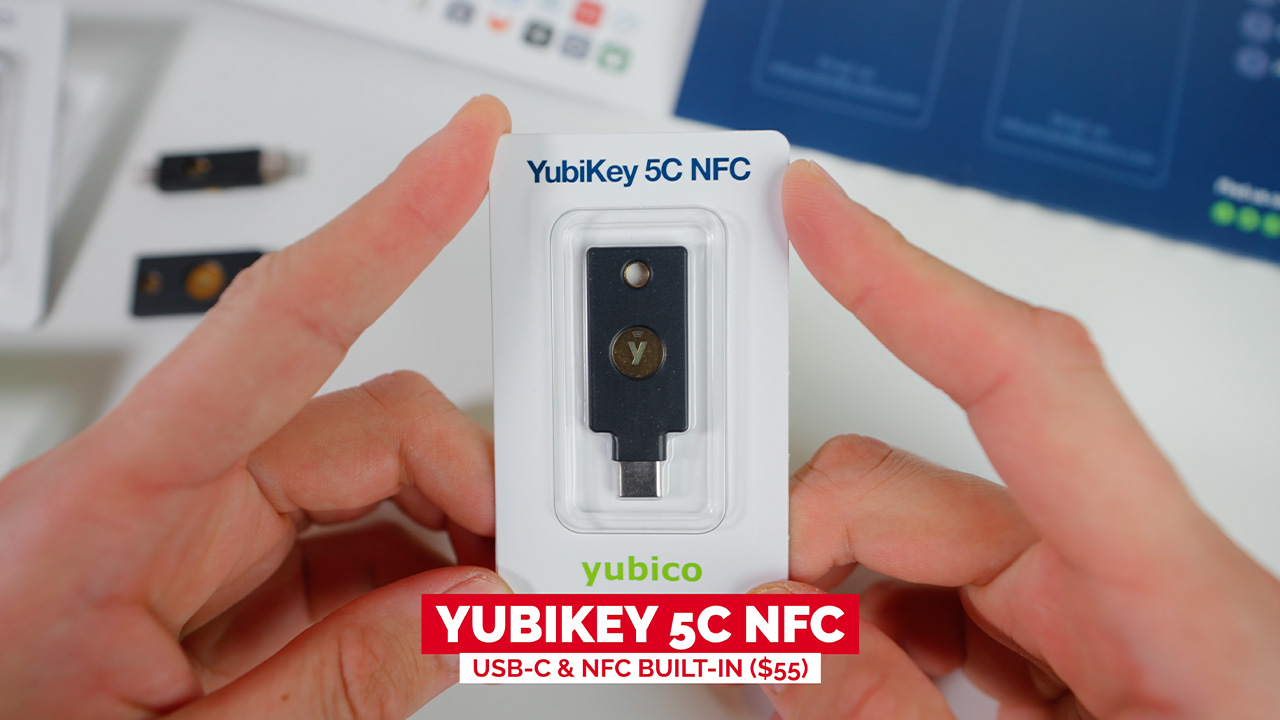
Also keep that in mind that if you happen to have a USB-A version, and if you want to use it on a USB-C devices, you can have one of these adapters on hand to convert from USB-A to C (or C to A).
If you decide to get one of these devices. Here are links to get them:
If you're not still sure which device you should be getting. Yubicoous has this QUIZ. It's going to help you define and pick the right item for you. And if you just want to have one device to try out, I strongly recommend Yubikey 5 Series which is 5 NFC and 5C NFC.
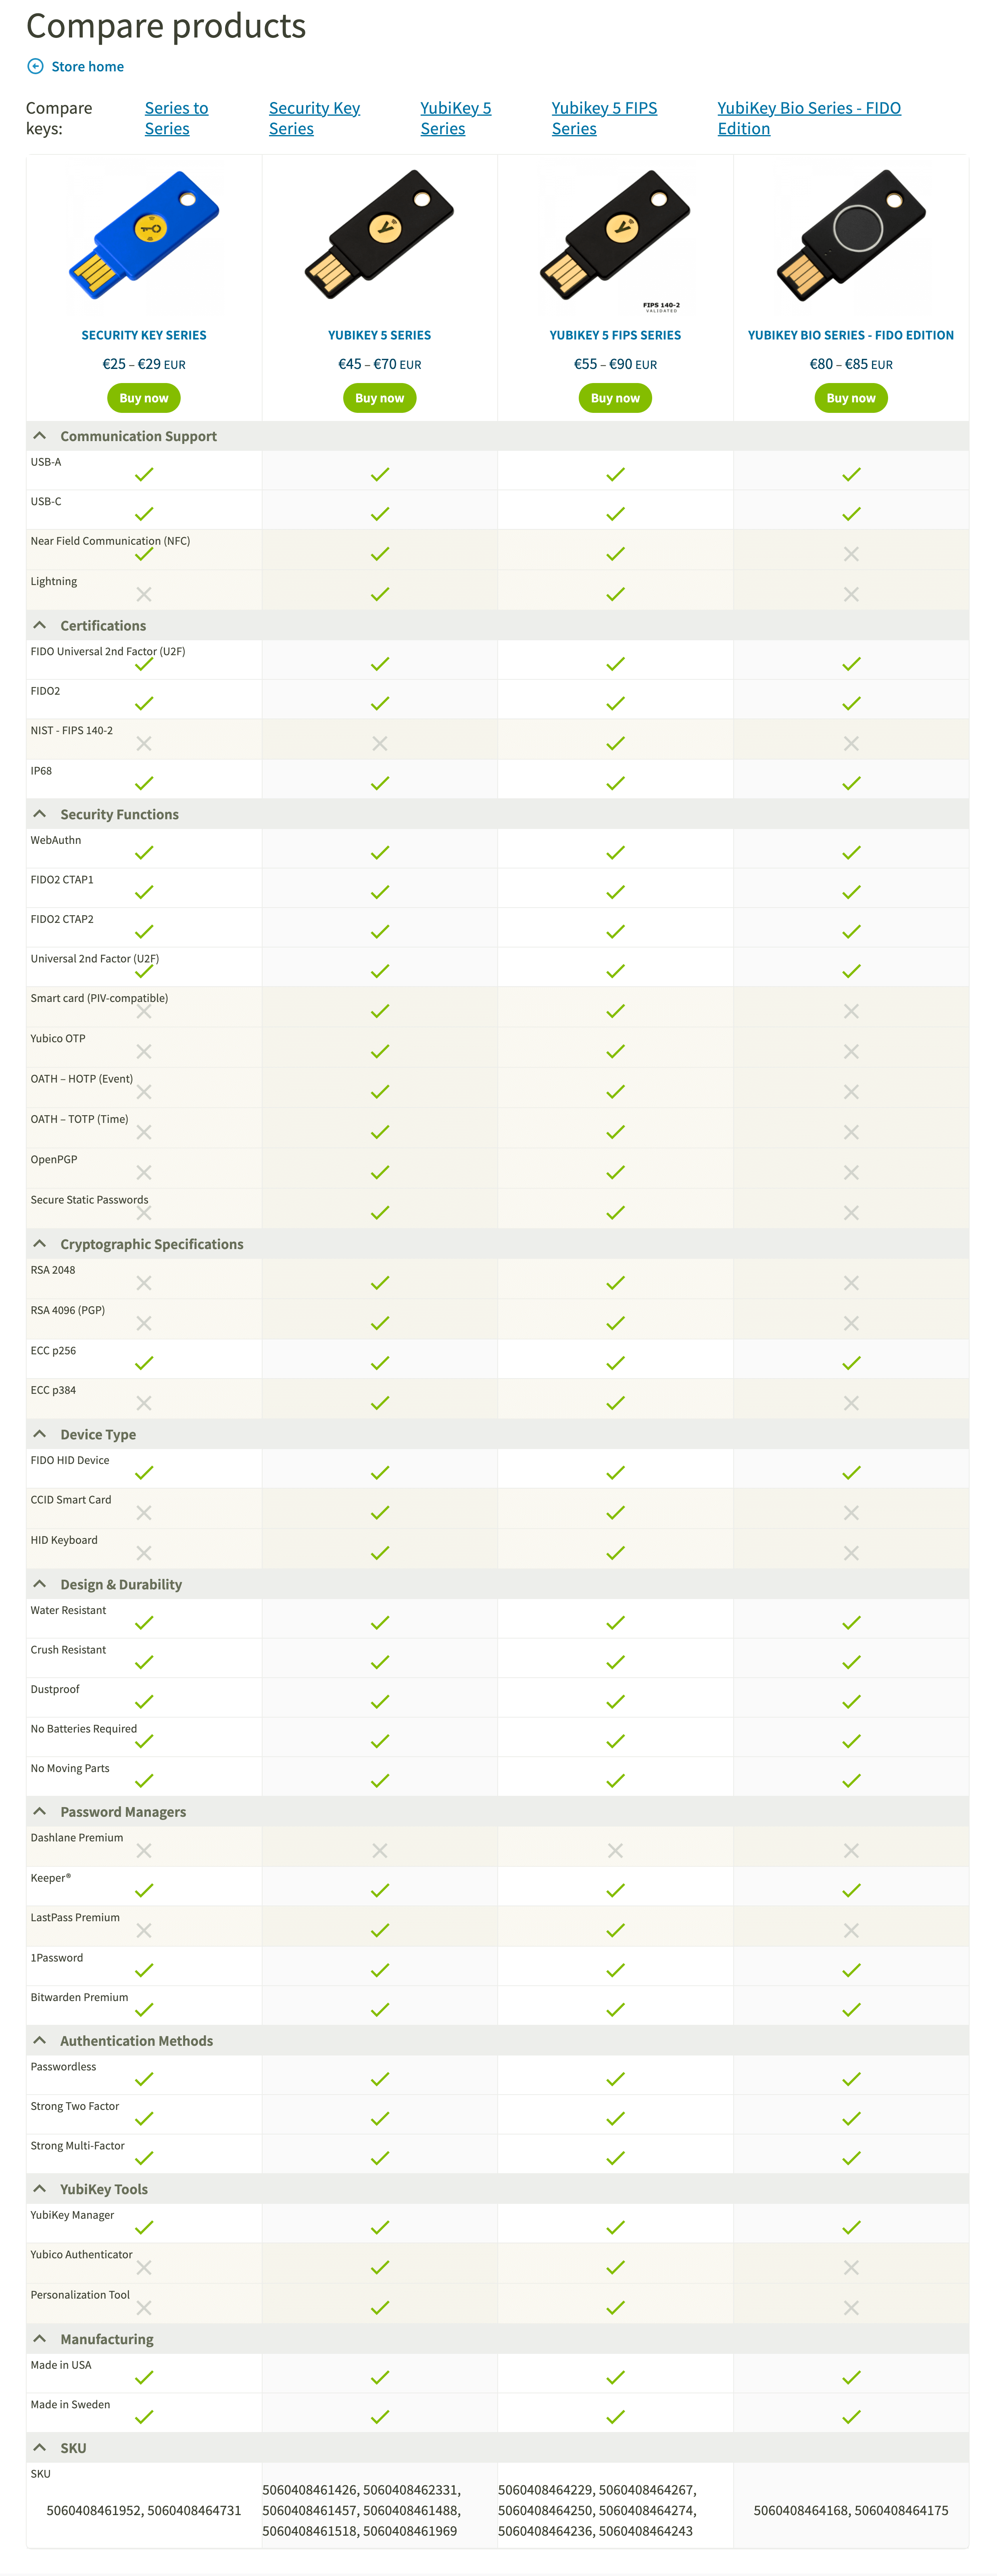
Here is a comparison chart on different types of Yubikey series:
How to Setup Yubikey
In this next section, I'm going to show you guys how to add a Yubikey into your Google account. So every time when you log into Google products after typing your email and password, It's going to prompt you to insert the Yubikey in order to finish the log in process.
Method 1: Universal 2nd Factor (U2F)
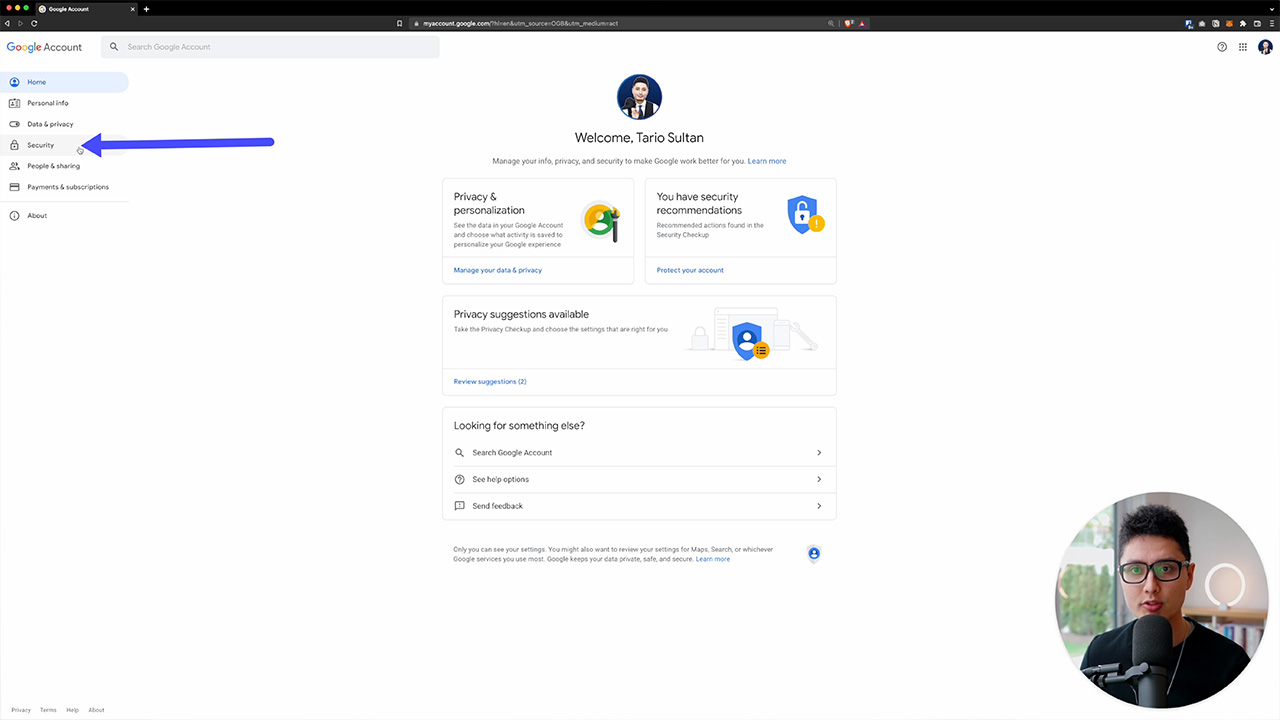
First thing you want to do is come to any of your Google products like Google.com or Google.ca. On the top right corner you're going to see your profile picture. Click on it. You're going to see one option says Manage Your Google Account. Click on it, it should direct you to Google Account Dashboard, you want to come to security which is the 4th option on the left hand menu. Under "Signing into Google" you're going to see "Two-Step Verification" option.
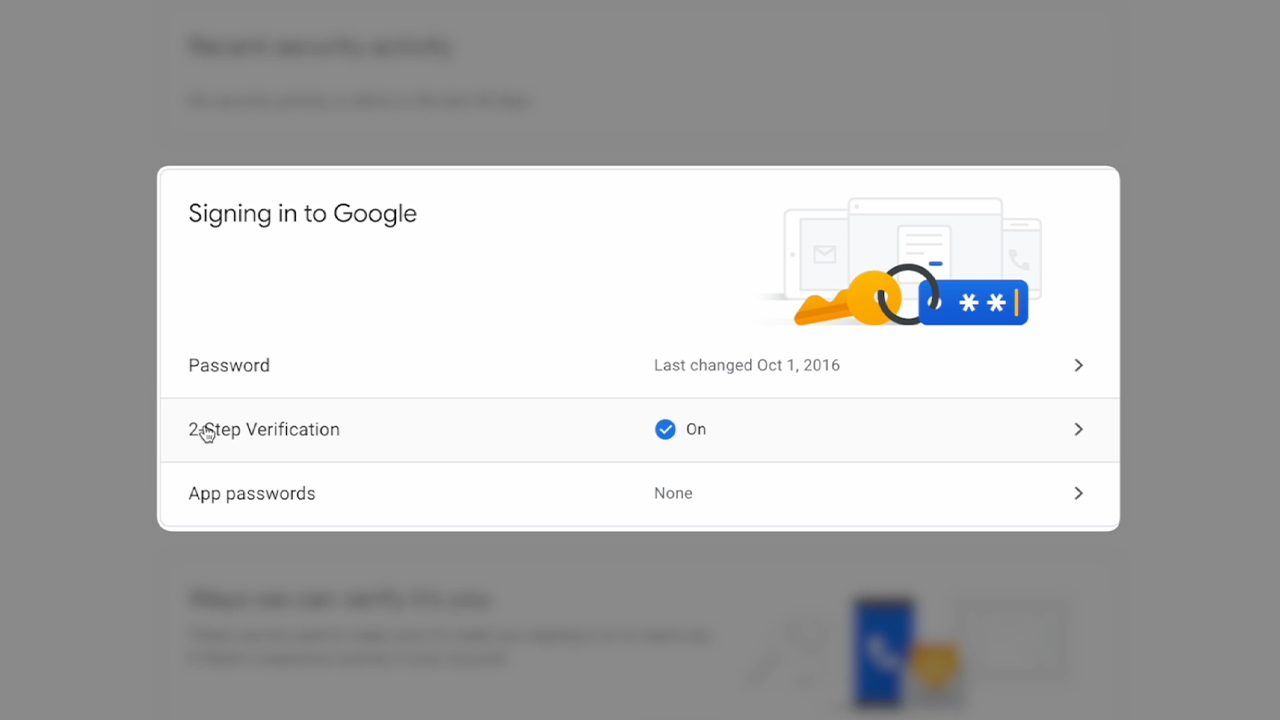
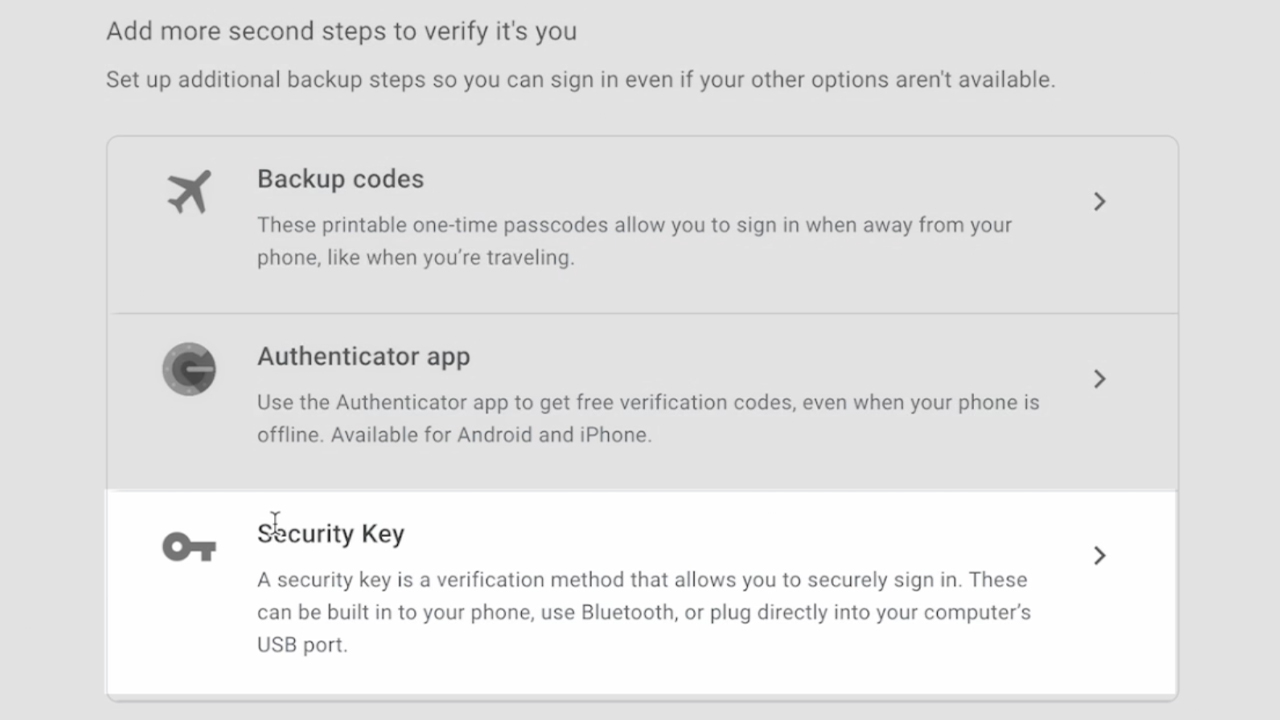
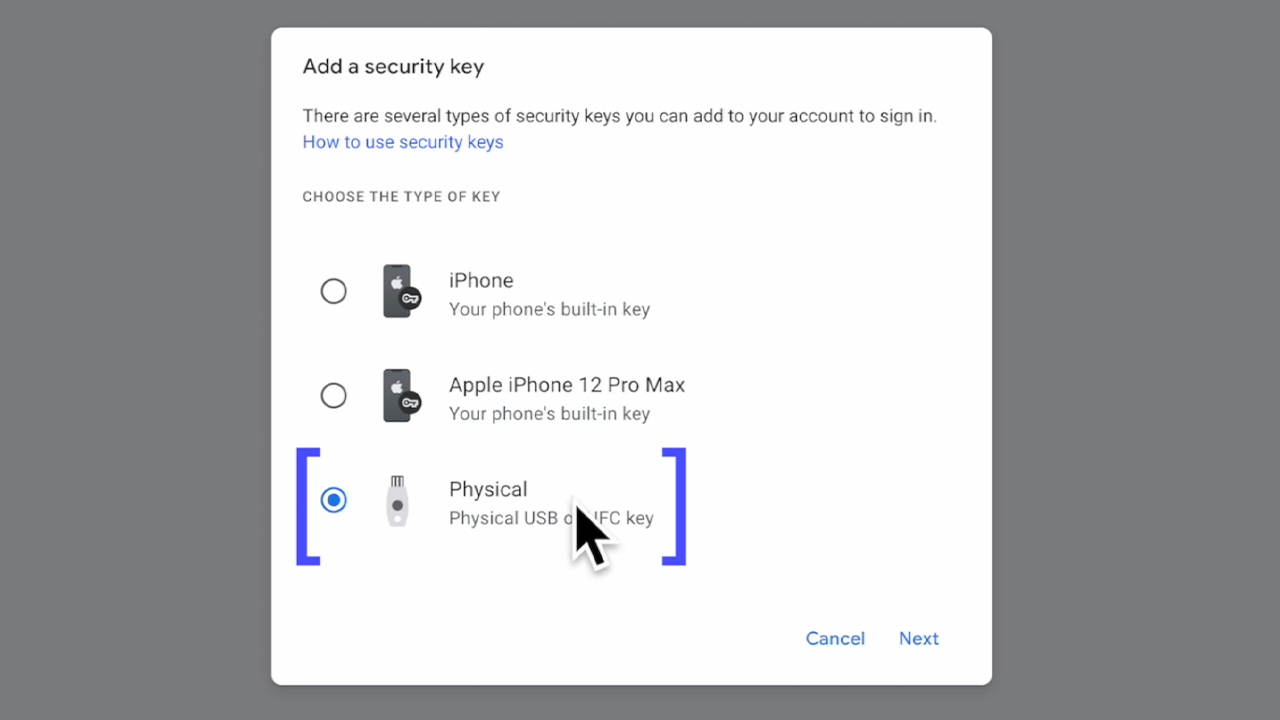
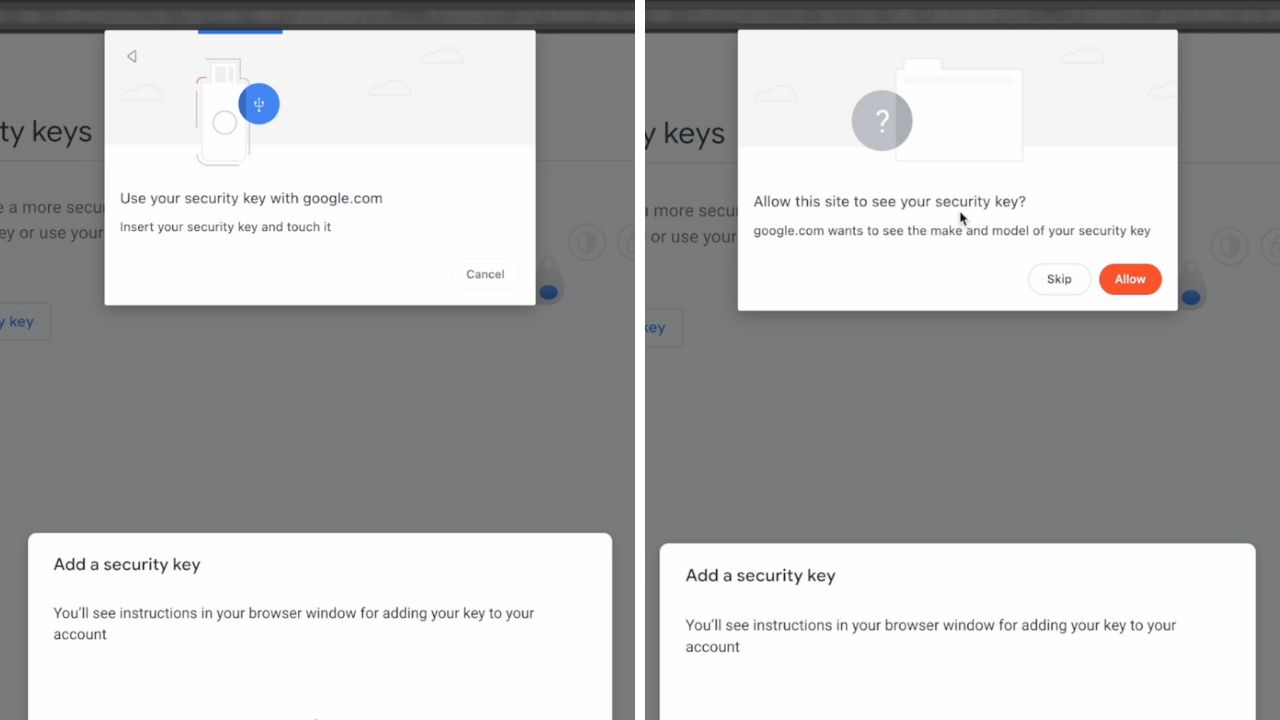
Once you open it you should be able to see an option says Security key. Simply click on Add security key. On the popup window, the one we want to select is a physical key option.
Click on next. And now the system is prompting you to insert your Yubikey. So in my case I'm going to insert this Yubikey 5 NFC. Now once you insert it you have to touch it with your finger on the copper connector.
The window shows "Allow the site to add security key". I'm going to click on allow. A really important part is if you're planning to use one or more Yubikeys. It's important to name these keys properly.
Click on next. That's it! We've just successfully added the Yubikey into your Google account. Click on next one more time. Here's a few tips for you to read about.
I'm going to eject this Yubikey I just inserted. I'm going to insert a second Yubikey. So my plan is to use two devices on a daily basis. One of them is going to be at home, the other one is going to be carried around on my keychain and the third one is going to be a backup (put it somewhere secure). In this case, I'm going to add two more times into my Google account.
Generate Google Backup Code
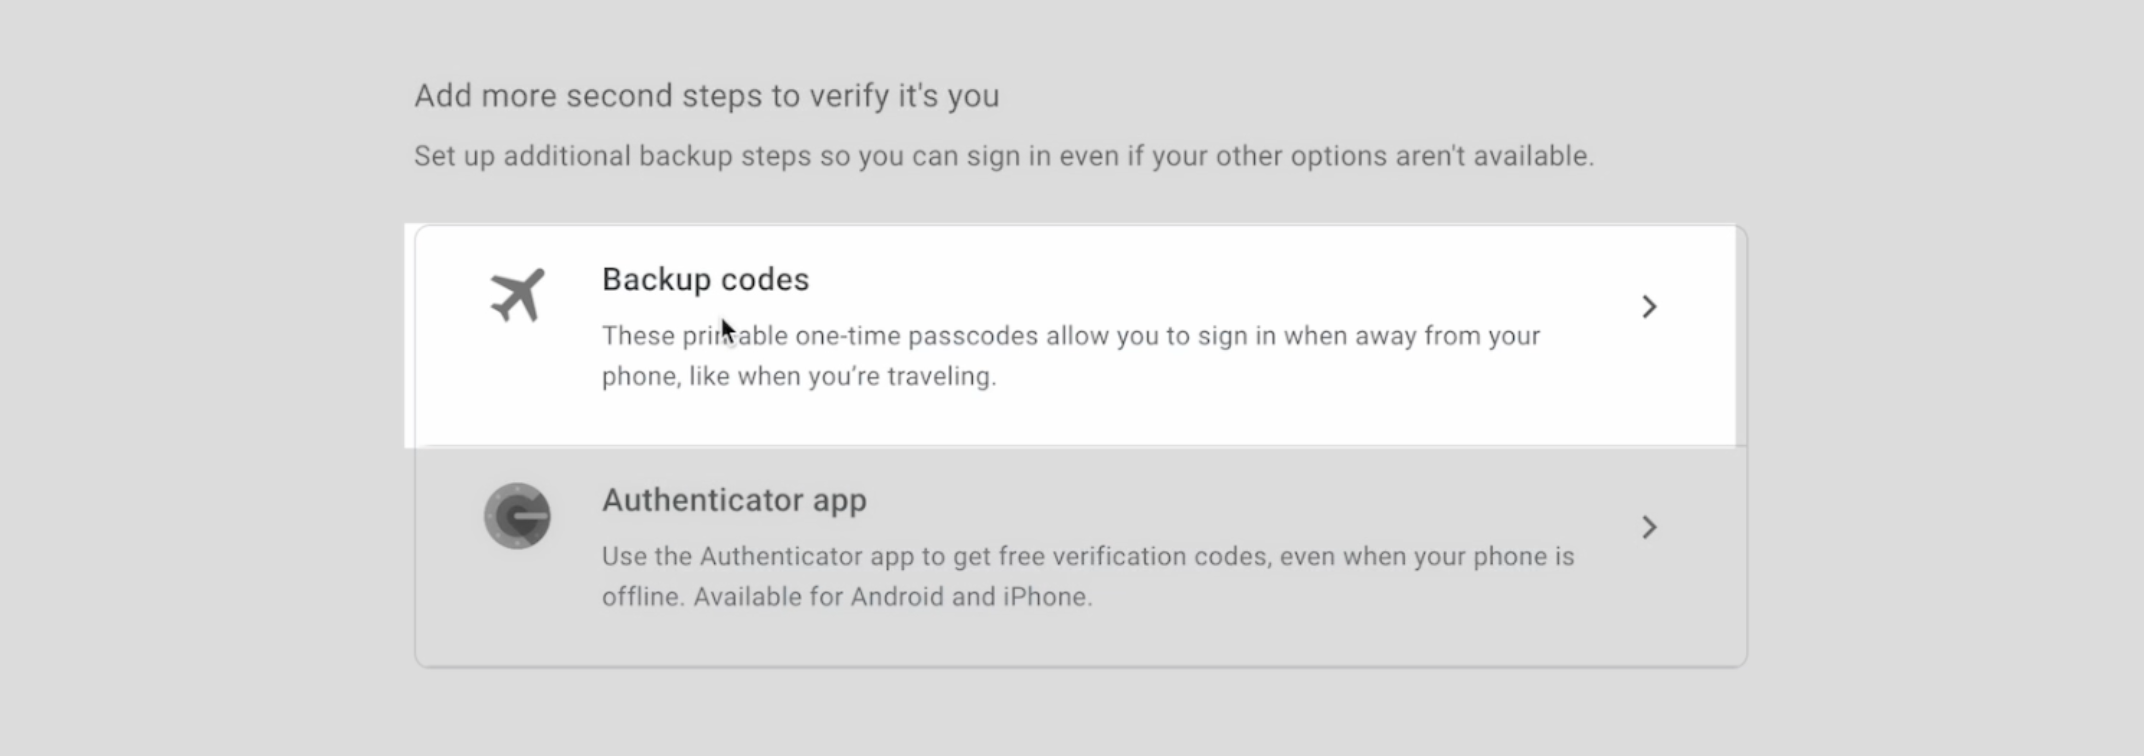
And now I have successfully added three Yubikeys into my Google account. So moving on forward, I can use any one of these keys to log into my Google account. However, I strongly recommend you guys to do one more step.
What I'm going to do is generate a backup code. If I lost all these Yubikeys, I'm able to use this one time passcode to still be able to login to my Google account just in case. For that extra layer of security, I'm going to click on "Generate Backup Code" option and enter your Google password.
And now I'm going to generate a backup code. What I do recommend is you print them. That's the first backup. Second, you can download this code as a .txt file. Now with this TXT file you can save it on a thumb drive and encrypt the thumb drive and put it somewhere safe in a different location. In the future, if you can't find the paper one. You can always go access to the thumb drive. (Or you can also do a screenshot if you prefer that method.)
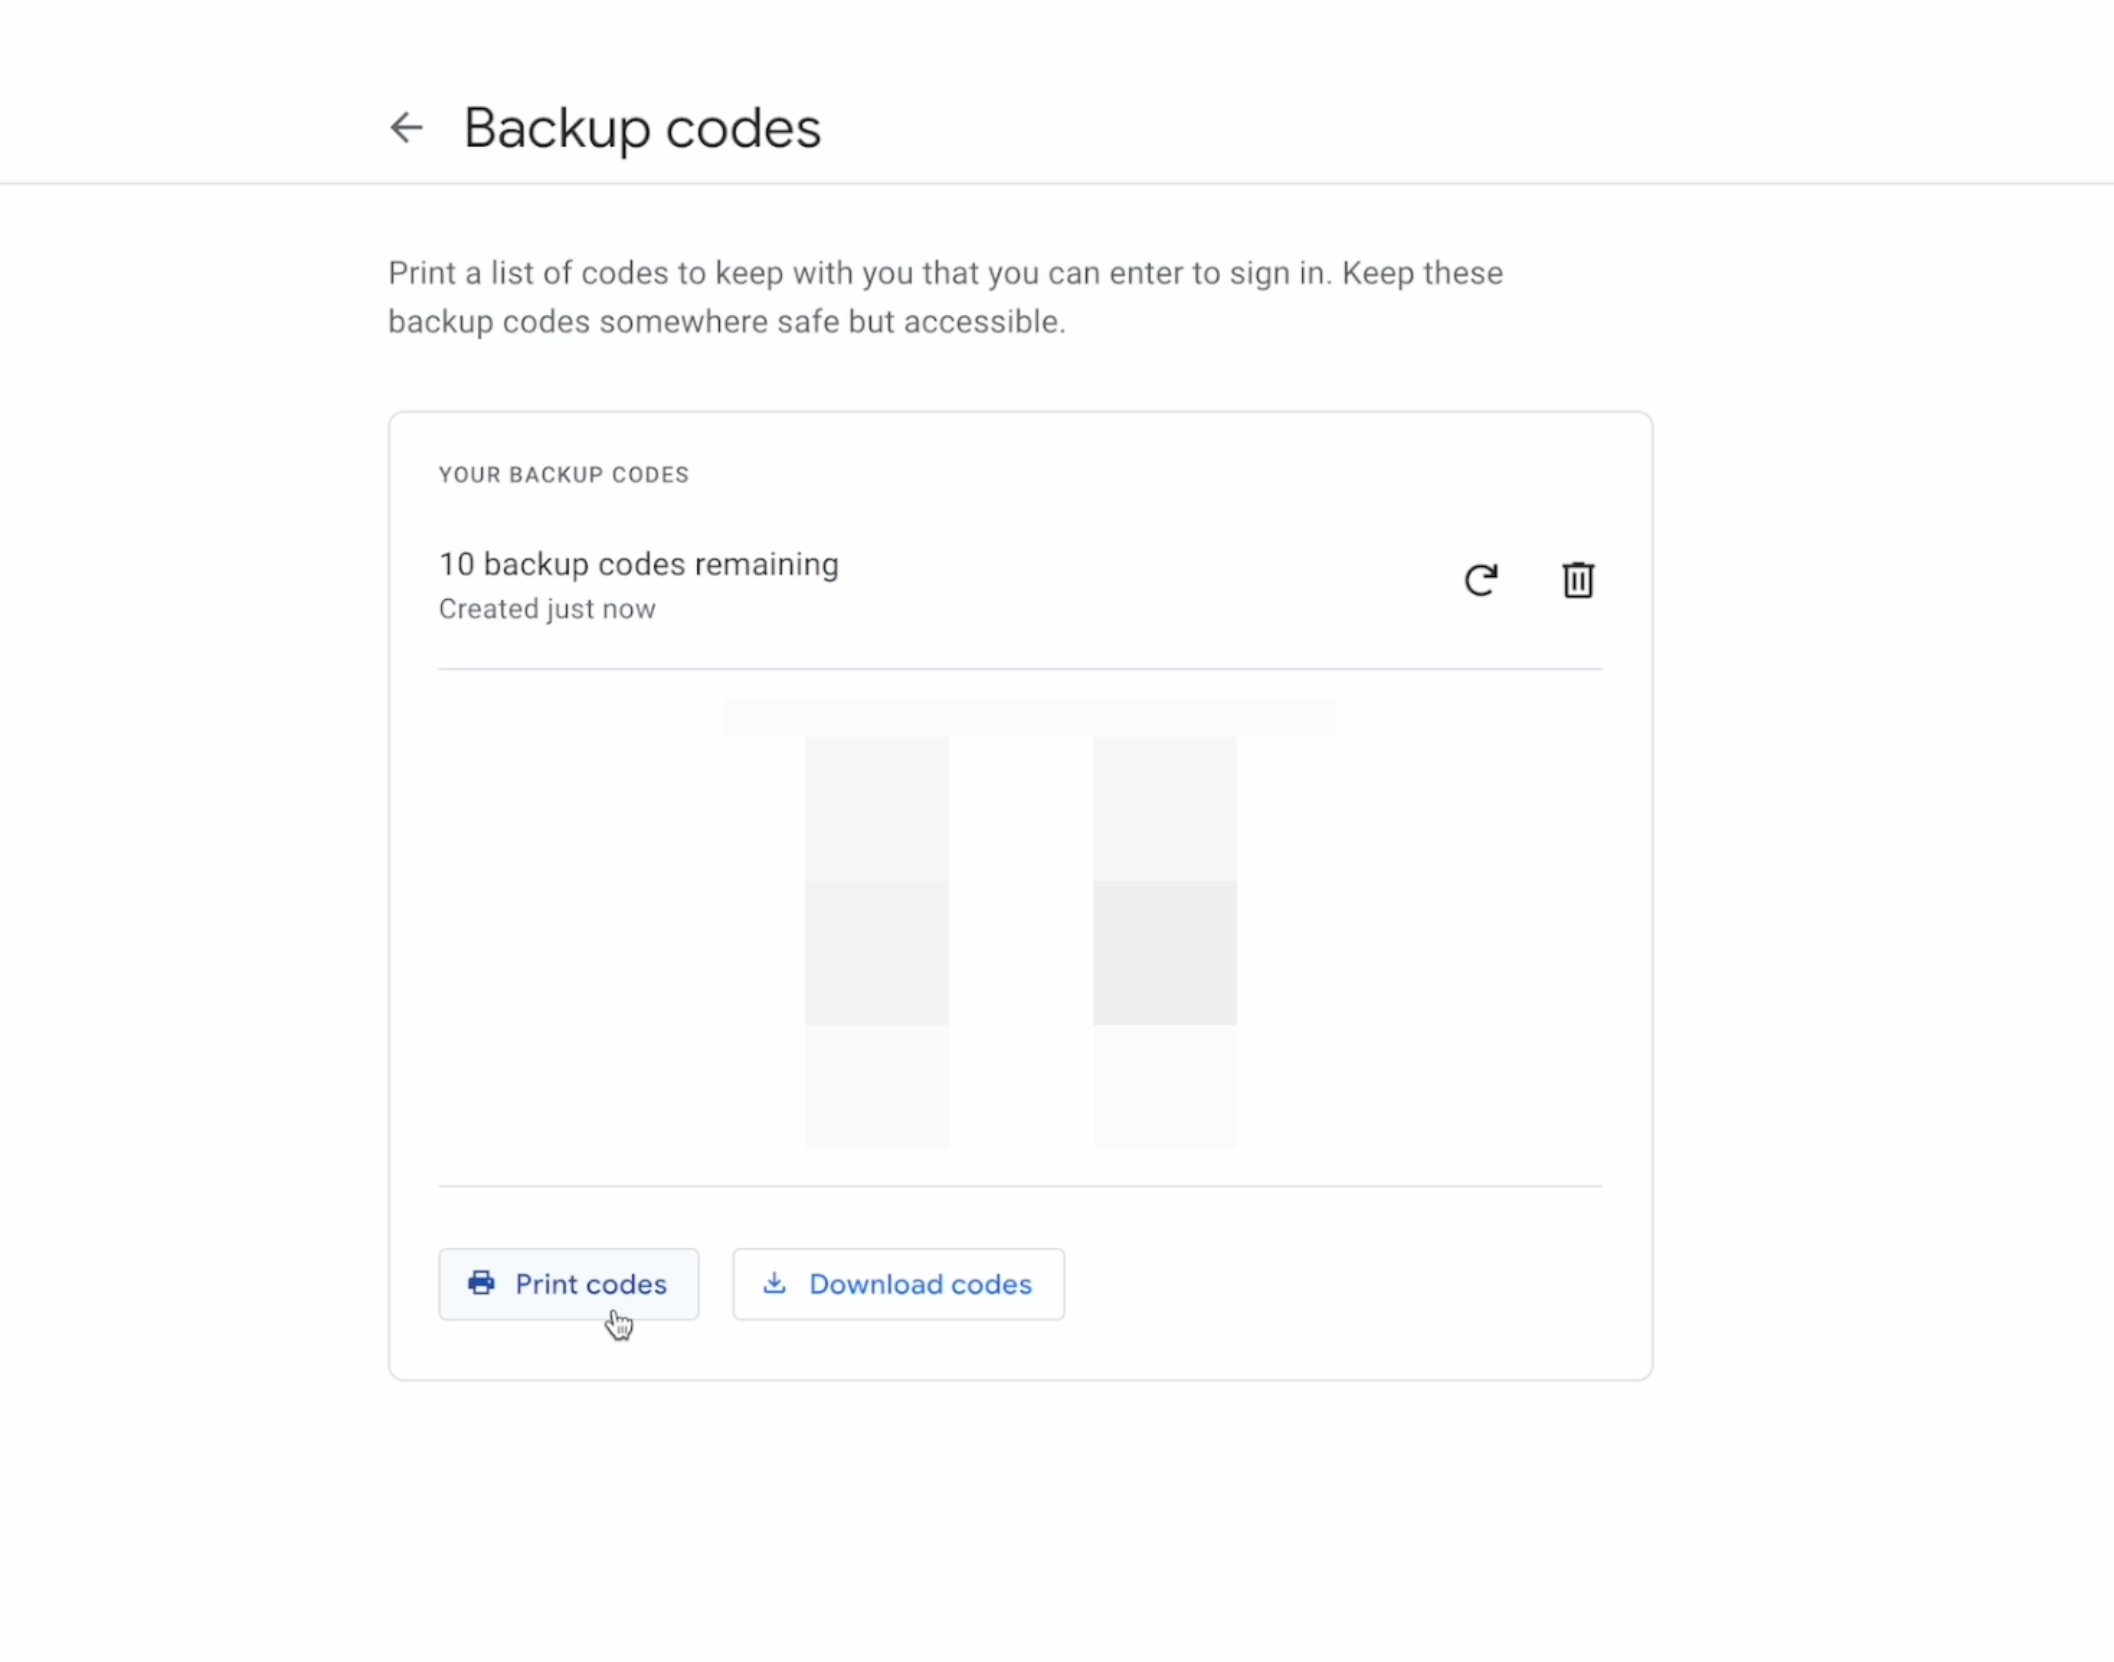
And keep this in mind. This is a one time backup code means if you used it once it becomes inactive, you have to regenerate it.
How to Remove a Yubikey
Now I want to show you what if you want to remove one of the Yubikeys. Just come to secure the keys by default here and click on right arrow. So now let's say I want to remove the Yubikey 5 NFC and I'm click on this trash icon which is deleting the Yubikey from your account.
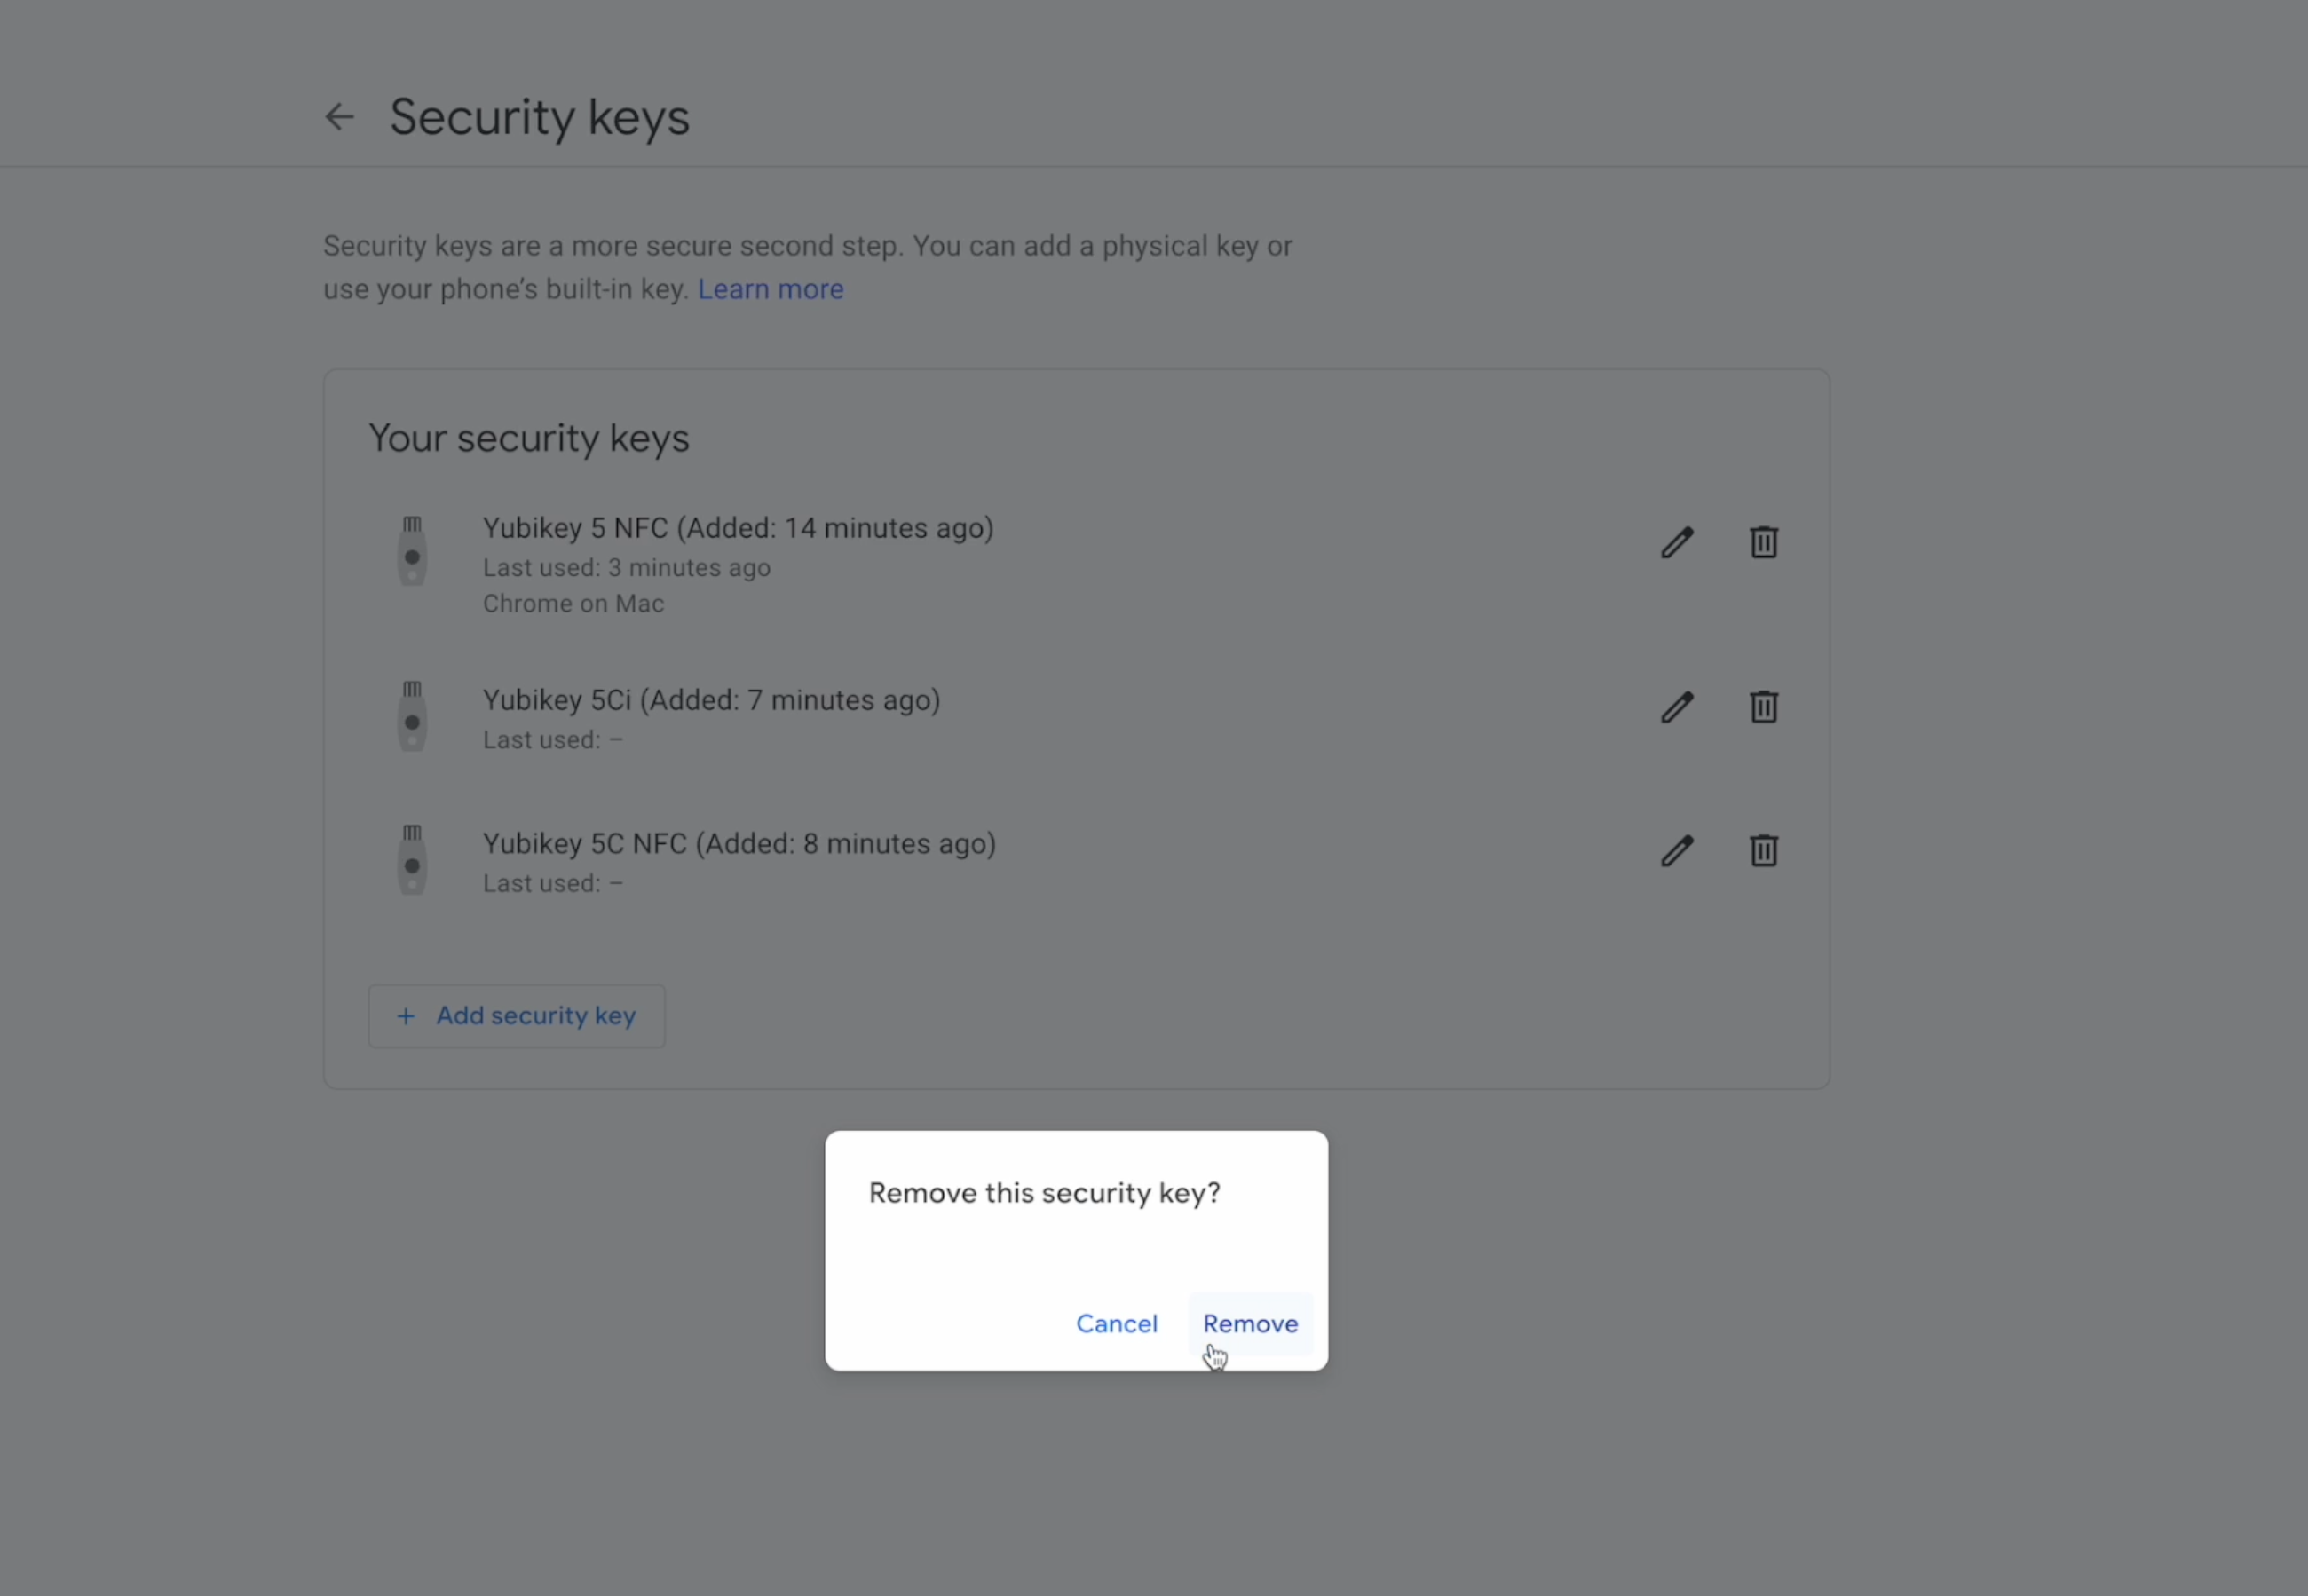
And it's going to say do you want to remove the security key? I'm going to click on remove. And now that Yubikey has been removed from your account.
Remove Unnecessary 2FA Options
Very last point: once you have your Yubikey added to your Google account and you have your 10 backup codes generated, feel free to remove the other two steps of verification methods such as SMS or voice, as well as Google prompts. So that way you only have two methods to log into your Google account, which is Yubikeys as well as backup codes.
List of Applications Supporting U2F
Now if you have successfully added this Yubikey to your Google account, Congratulations. You have just used one of the methods to use Yubikey. That's called Universal 2nd Factor (U2F), also known as FIDO or FIDO2 protocol.
Here is a list of applications that support Yubikey on the U2F protocol.
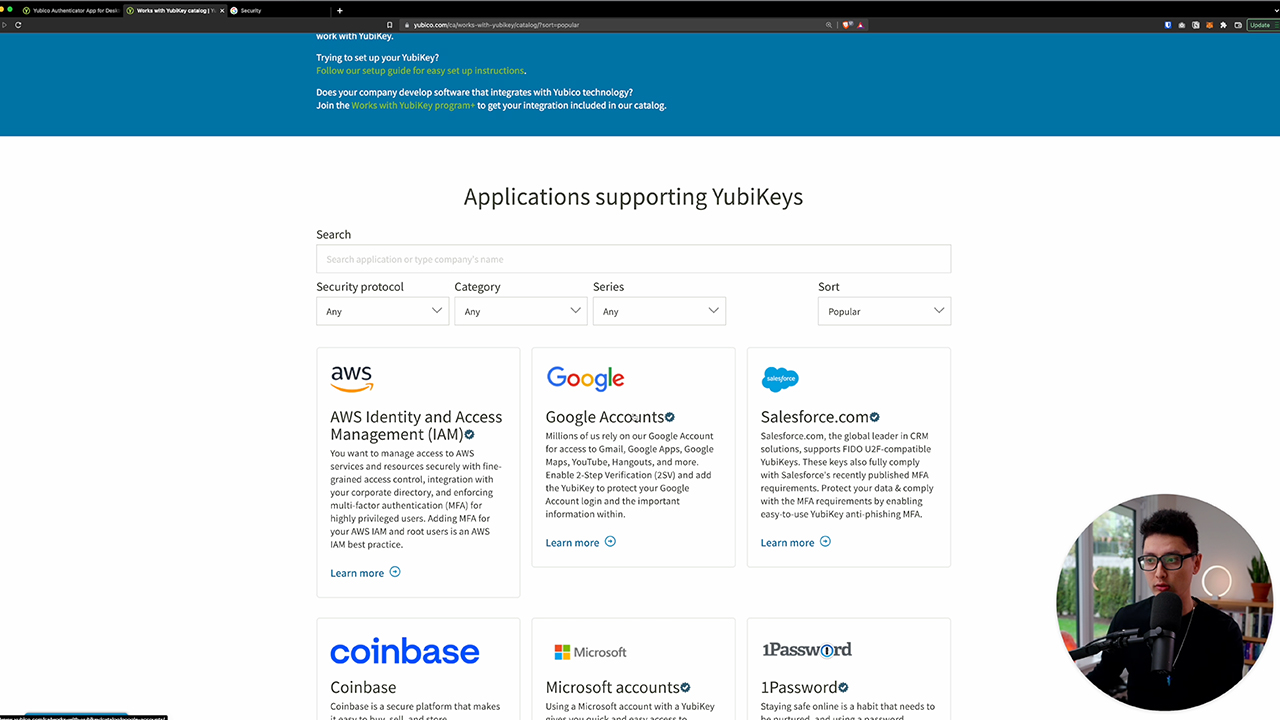
What I just showed you is Google accounts. However, there are many other ones. If you're trading crypto, I'm going to make a separate post on the crypto subject alone where I'm going to cover Coinbase, Binance and other exchanges. And you can see here the most popular ones we use on a daily basis could be Twitter, Facebook, Youtube, Government UK, Epic Games, etc. There's many other platforms you can see. This list is very long and you can check it out yourself to see if your daily application that supports the U2F protocol.
Method 2: One-Time Password (OTP, TOTP)
And now I'm going to show you guys a second way to use the Yubikey, which stands for One-Time Password (OTP) or Time-Based One-Time Password (TOTP). If you have experience with the Google Authenticator app, that's basically a OTP protocol where every 30 seconds the Authenticator app is going to generate a 6 digit codes for you to enter in order to log into your platform. As long as your platform supports two factor authentication, then you can basically use this OTP method.
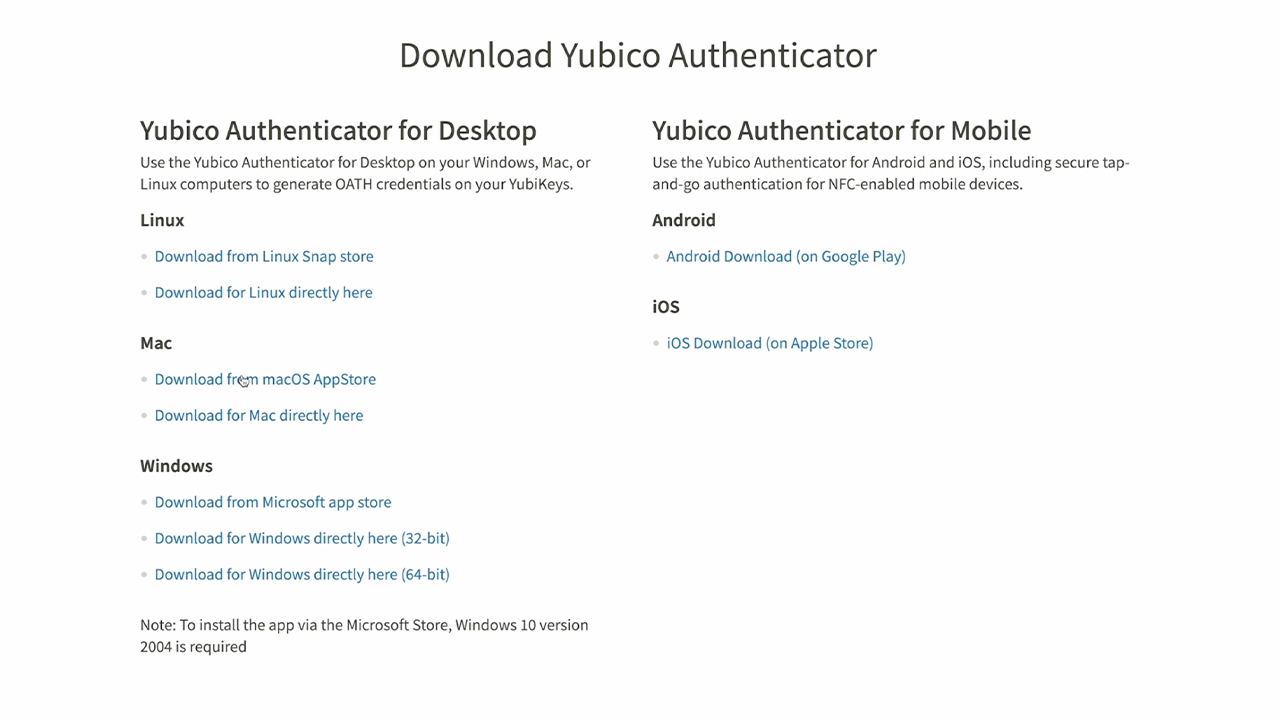
First thing, you need to download Yubico Authenticator App. Depends on what software that you use. In my case, I'm a Mac user. I'm going to show you guys how everything is done on Mac as well as iOS devices. If you're Windows or Linux user, the steps should be identical.
First thing I'm going to do is click on the first option says Download from Apple Store. Click on it. It should redirect you to the Apple Store Yubico Authenticator app. Click on Open with App Store and you want to get and install this app into your Mac system.
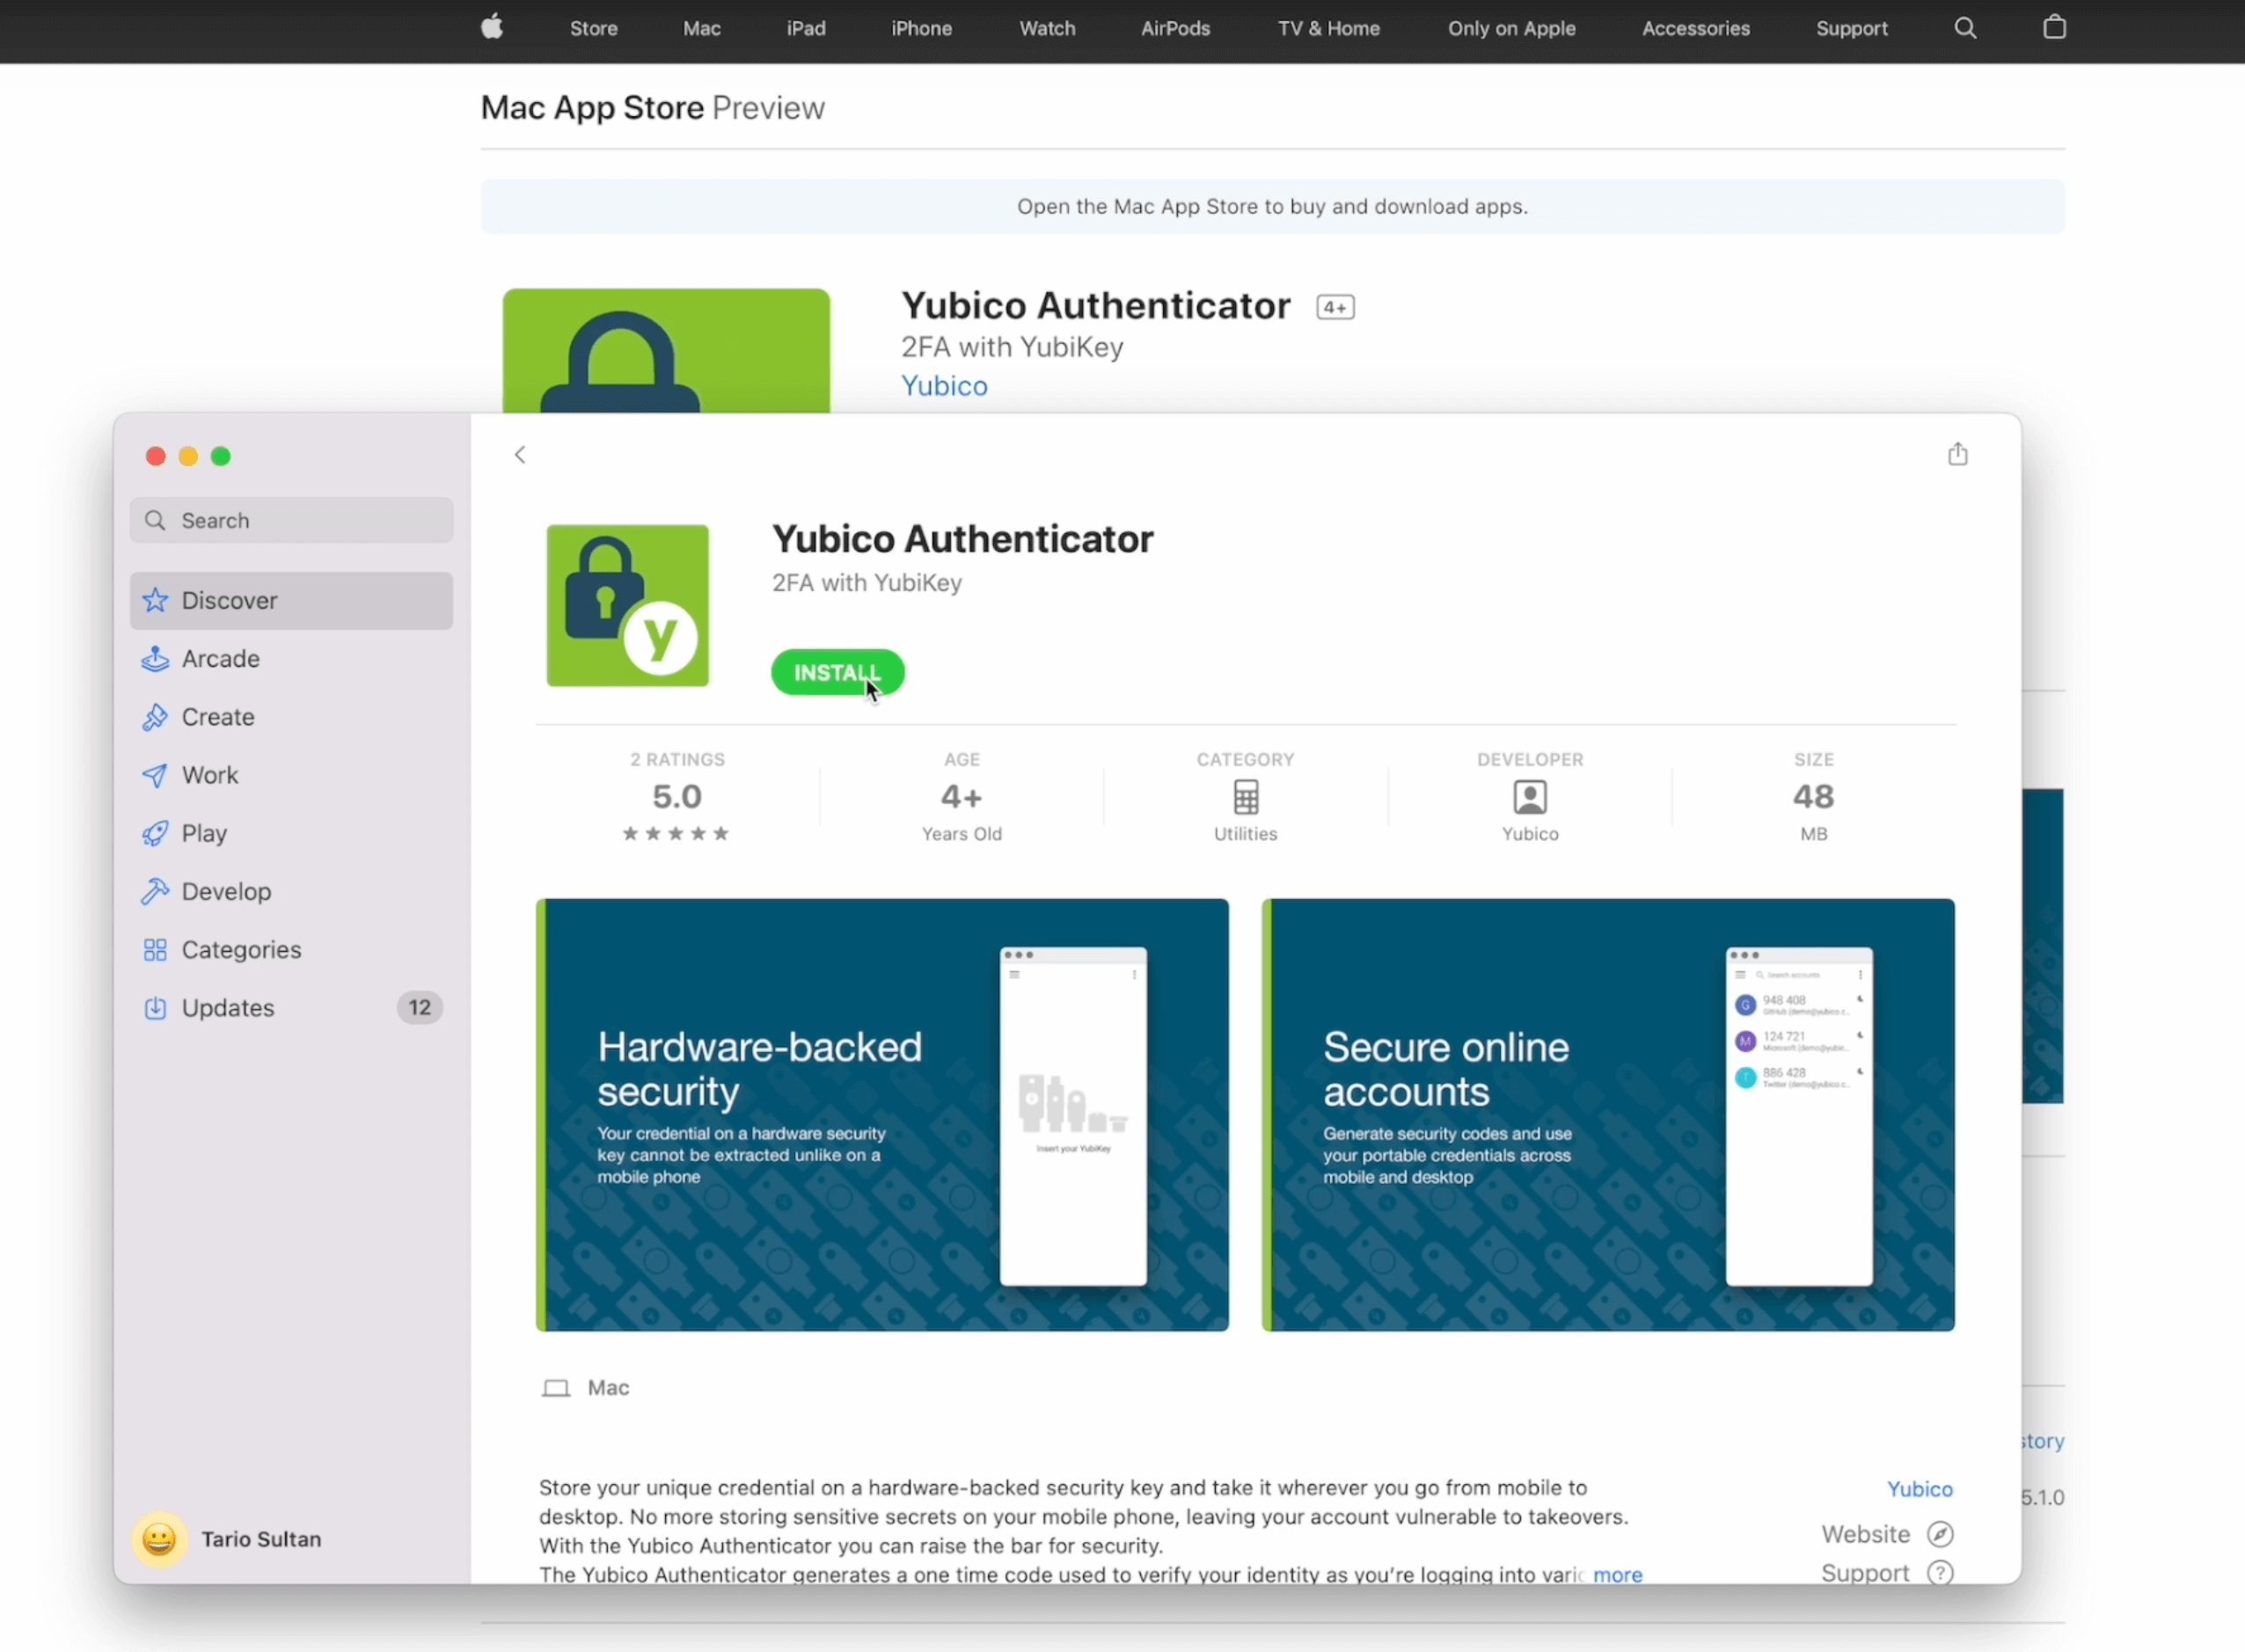
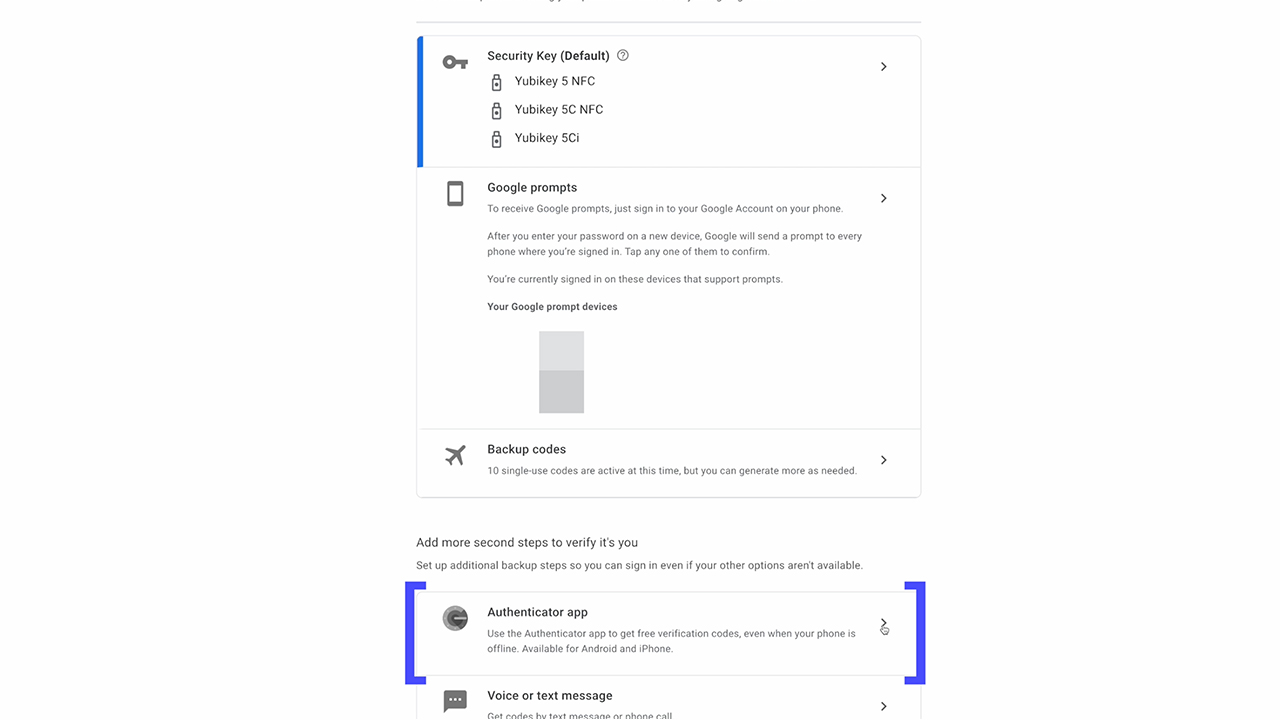
Once you finish installing the app, just click on Open and leave the app open. Next, you want to come to your Google account come to the 4th option again: Security. You want to come to a two step verification.
Come to the Authenticator app option. We are going to basically set up an Authenticator app with the Yubikey. Just make sure you have the Yubico Authenticator app open on the side because it's going to scan on a QR code on the screen (as long as you leave the QR open on the screen).
Once you're ready with that, click on set up Authenticator and now Google is automatically going to generate a QR code for you to scan. You might want to do a screenshot on this QR code or print it out like how I showed you guys earlier. Just in case. If anything happens, you can always rescan this QR code and re-add the QR code into a new Yubikey or something.

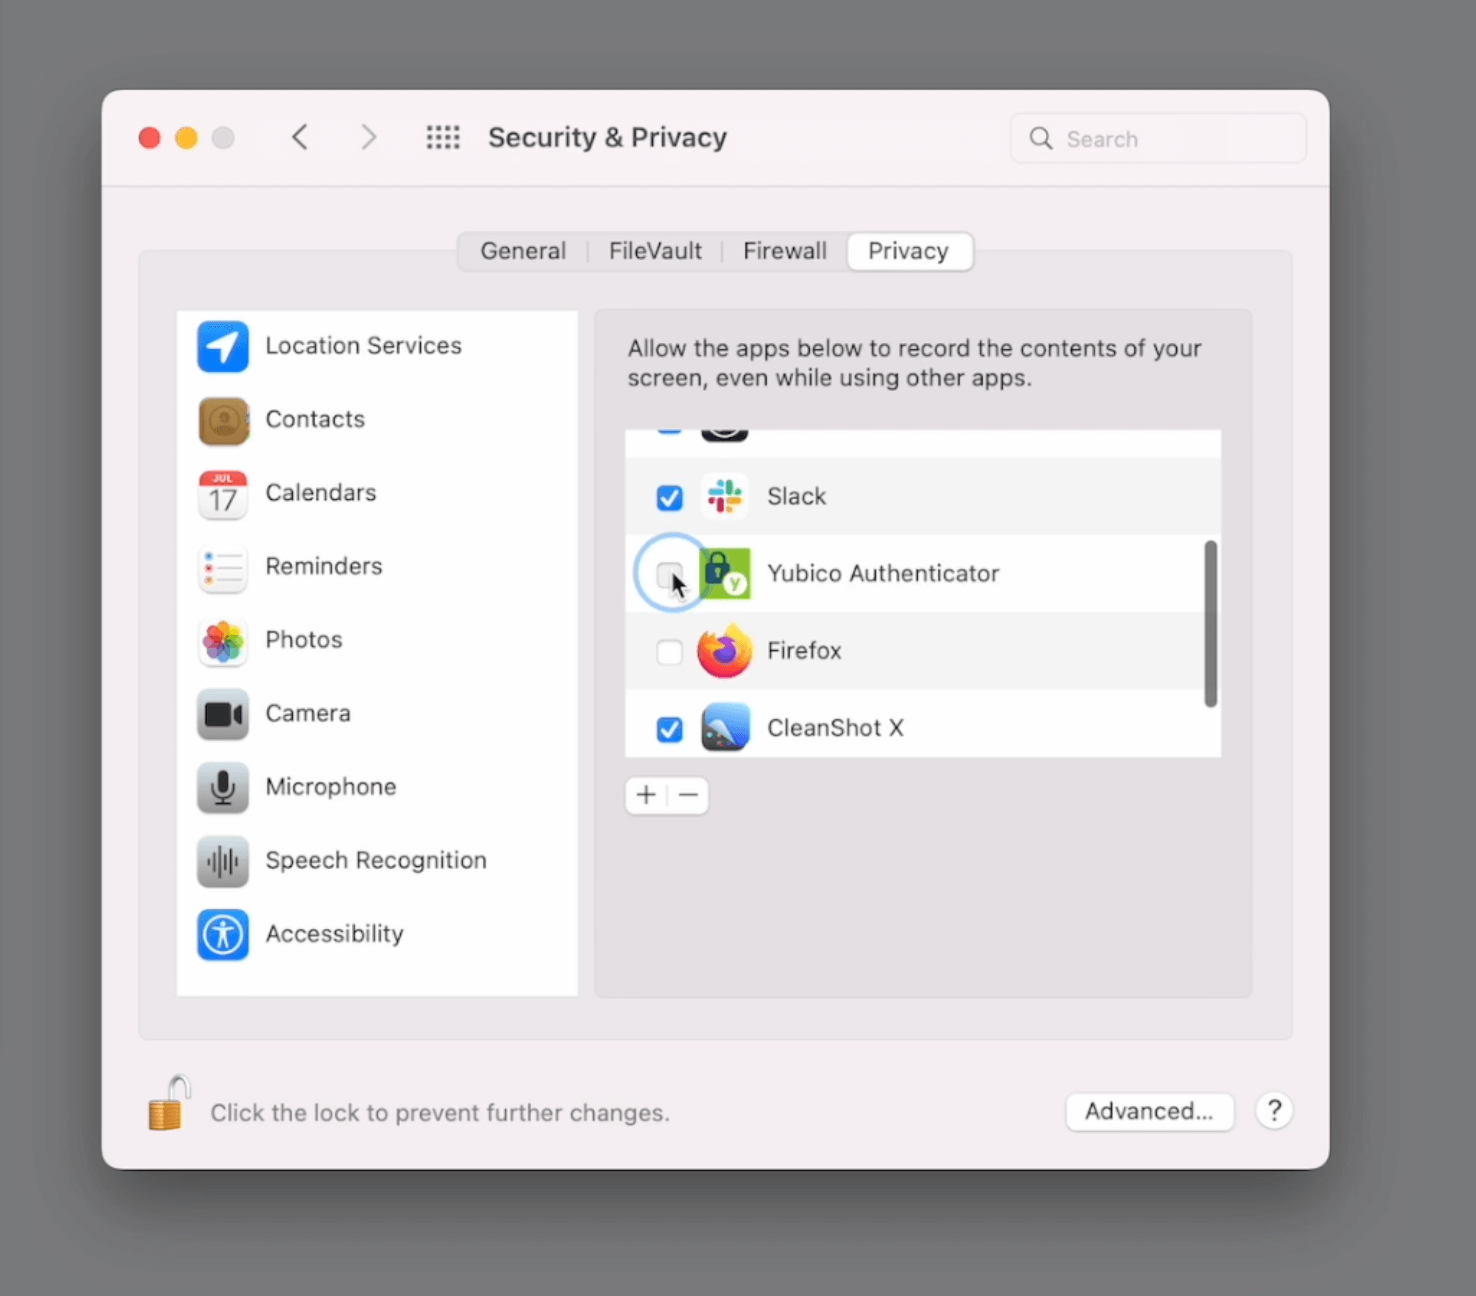
When you get everything ready, simply click on the top right, three dots. It's going to show you an option says Scan QR code. (PS. If this is the first time using the Yubico Authenticator app, you may want to give permission for this app to scan your computer screen. Basically you want to open System Preferences and unlock the lock on the bottom left corner and you want to scroll down and find Yubico Authenticator and you want to give it a check. It will quit the app and reopen it.)
The Scan QR option will automatically scan the QR on the left. It found the issuer which is Google and it also found account name which should be your Gmail address. Now you have the third option here is to either require touch or without it. So it's totally up to you. I'm going to add account. Now once you add it into your account you're going to see that it's going to generate six digit codes every 30 seconds.
You need to enter the six digit code and to verify and finish the entire set up. Once you're done with that, click on Verify and you're good to go. Now I have successfully added this Authenticator app into my Google account and now once you have one or more Yubikey devices, it's really good idea to add all of them at once. Just a quick tip here: because you have already finished setting up the first Yubikey with this Authenticator apps, you can use the QR code screenshot I recommended early to continue adding the 2nd, 3rd Yubikey you may have.
All you need to do is inserting a second key. Now I'm going to click on the top right corner three dot again and the scan QR code also going to load the same information the issuer the account number. Now I have added the same OTP QR scan onto two different devices.
How to Use Yubico Authenticator App on iOS/Android
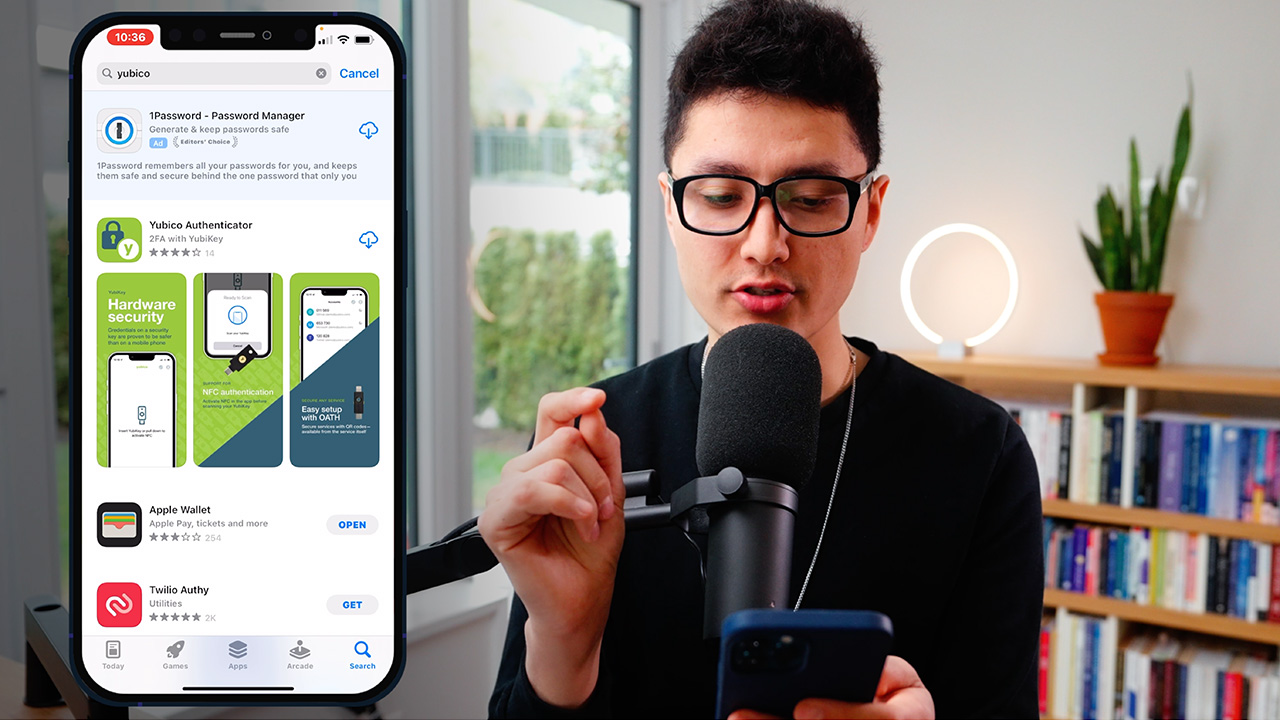
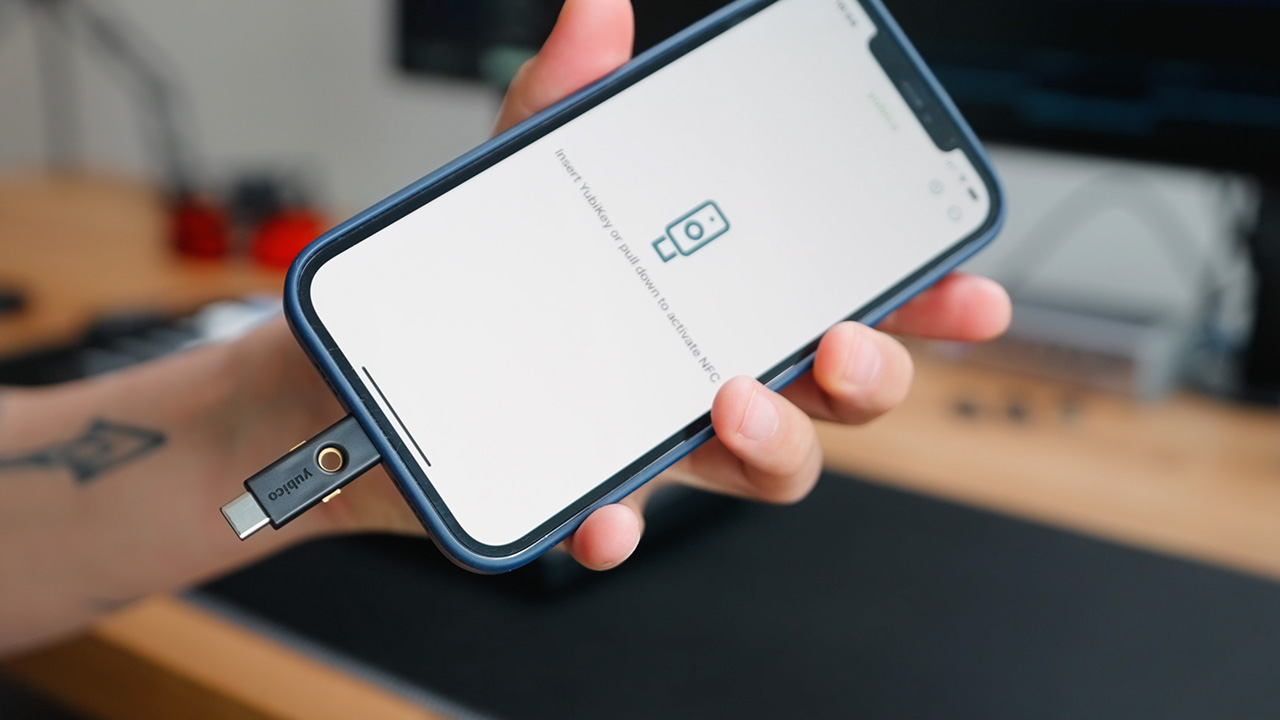
Now I'm going to show you guys one more step which is to load Authenticator app on your iOS devices. Come to app store and click on search. You want to search "Yubico". That's all you need to type and click on search. It should be the first option says Yubico Authenticator and just click on download this app onto your iPhone. Click on open and now keep that in mind, I have already scanned the QR code on all these three devices.
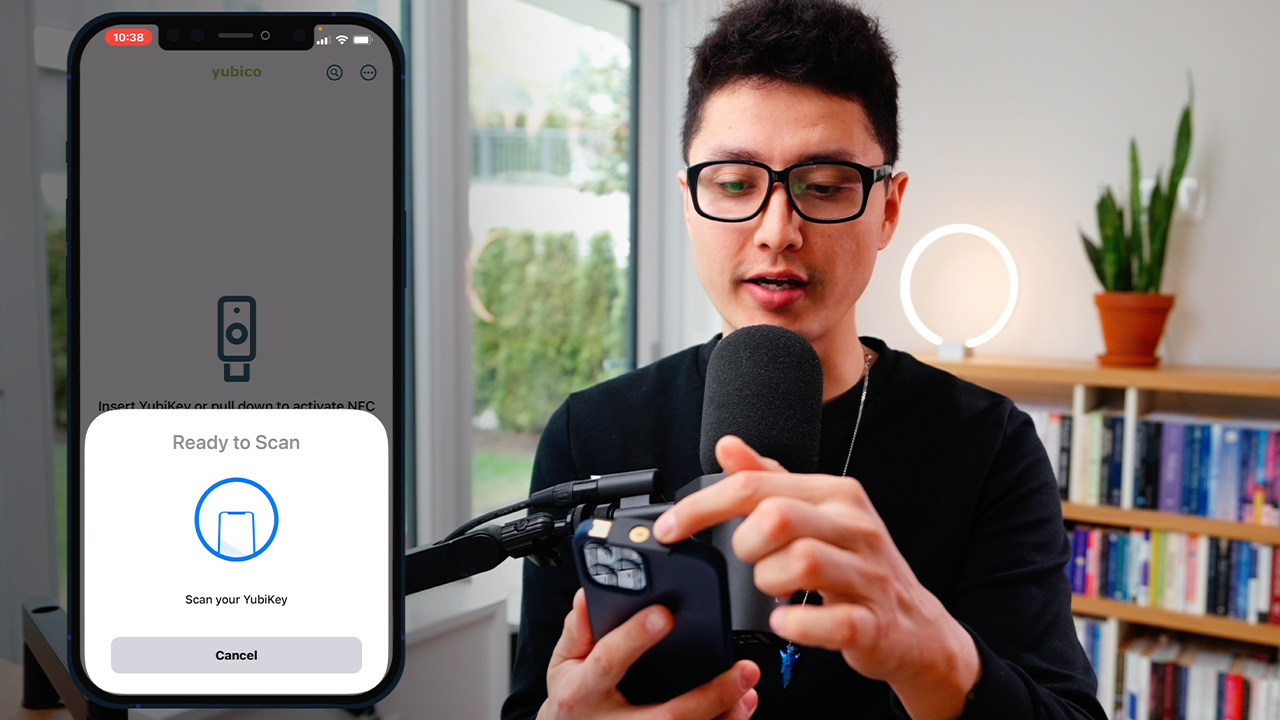
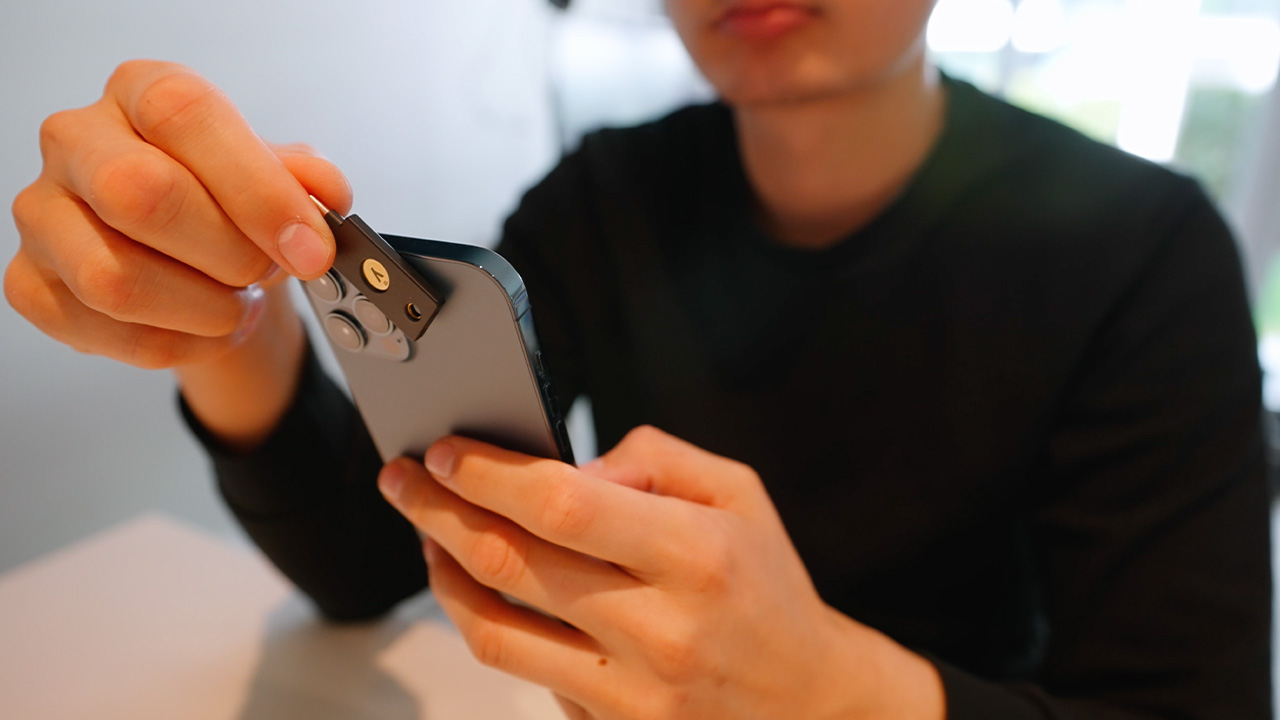
All I need to do is grab one of them. It doesn't matter which one, either I need to insert a Yubikey or pull down on the screen to activate NFC feature. In this case, I'm going to pull down. It's going to tell you it's ready for scan. Now I just need to grab one of the Yubikey that supports NFC and put it on top of my phone and let my phone scan the Yubikey.
And now authentication has been successfully loaded. If you happen to have the Yubikey 5Ci which is one of these devices you just need to insert this device into your iPhone. Immediately, it will show you the time based one time password.
Final Thoughts
Now if you stick to this part of the video Congratulations you've just learned two different methods to use the Yubikey on your daily basis. Just a quick tip here. My personal preference here is always do a screenshot on QR code or back up code and save it and store it on two different thumb drives and encrypt these thumb drives (store them in different location).
So just in case if you buy a new Yubikey you can always open one of the thumb drives. Locate the file which is the QR code. Open it on your desktop, scan it with a Yubico Authenticator app to add this QR code on your new key. Keep that in mind. The OTP the time based one time code is actually generated on the physical hardware yubikey. So if you're you're currently using the Google Authenticator app I strongly recommend you to switch to using Yubico Authenticator app. It's much more secure in my personal opinion.
Hope you enjoyed this post, make sure you share it among your friends and family.
Stay safe online!
Much love.
More from
Tech
category


.png)

